Secure authentication with tokens
Authentication is the process of validating identities. Agora uses digital tokens to authenticate users and their privileges before they access an Agora service, such as joining an Agora call, or logging in to Agora Chat.
To ensure security in real-time communication, Agora provide tokens for you to authenticate your users. Tokens, generated in your app server, can be used in the following scenarios:
| Applicable scenarios | Used Token | Token consists of the following | Token maximum validity period |
|---|
| RESTful API calls | Token with app privileges | - App ID of your Agora Chat project
- App certificate of your Agora Chat project
- Token validity period for your Agora Chat project
| 24 hours |
| SDK API calls | Token with user privileges | - App ID of your Agora Chat project
- App certificate of your Agora Chat project
- Token validity period for your Agora Chat project
- UUID of the user to be authenticated.
| 24 hours |
This page introduces how to retrieve tokens from your app server to authenticate your users.
In order to follow this procedure, you must have the following:
If you have a firewall implemented in your network environment, Agora provides a firewall whitelist solution for you to access Agora Chat in environments with restricted network access. If you want to use the firewall whitelist solution, submit a ticket and our technical support will provide the target domain and corresponding IP.
This section shows you how to supply and consume a token used to authenticate a user with Agora Chat.
Tokens used in Agora Chat need to be generated in your app server. When the client end sends a request, the app server generate a token accordingly.
To show the authentication workflow, this section shows how to build and run a token server written in Java on your local machine.
This sample server is for demonstration purposes only. Do not use it in a production environment.
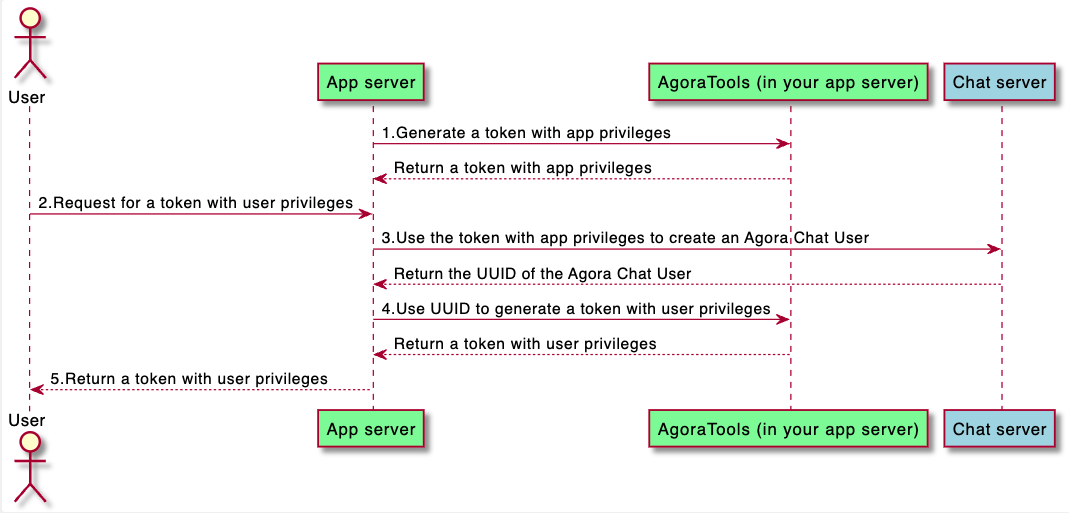
The following figure shows the API call sequence of generating an Agora Chat token with user privileges:
-
Create a Maven project in IntelliJ, set the name of your project, choose the location to save your project, then click Finish.
-
In the <Project name>/pom.xml file, add the following dependencies and click Reload project:
_55 <java.version>1.8</java.version>
_55 <spring-boot.version>2.4.3</spring-boot.version>
_55<packaging>jar</packaging>
_55<dependencyManagement>
_55 <groupId>org.springframework.boot</groupId>
_55 <artifactId>spring-boot-dependencies</artifactId>
_55 <version>${spring-boot.version}</version>
_55 <scope>import</scope>
_55</dependencyManagement>
_55 <groupId>org.springframework.boot</groupId>
_55 <artifactId>spring-boot-starter-web</artifactId>
_55 <groupId>org.springframework.boot</groupId>
_55 <artifactId>spring-boot-starter</artifactId>
_55 <groupId>org.springframework.boot</groupId>
_55 <artifactId>spring-boot-configuration-processor</artifactId>
_55 <groupId>commons-codec</groupId>
_55 <artifactId>commons-codec</artifactId>
_55 <version>1.14</version>
_55 <groupId>org.springframework.boot</groupId>
_55 <artifactId>spring-boot-maven-plugin</artifactId>
_55 <version>2.4.1</version>
_55 <goal>repackage</goal>
-
Import the token builders provided by Agora into your project:
- Download the chat and media packages.
- In your token server project, create a
com.agora.chat.token.io.agora package under <Project name>/src/main/java.
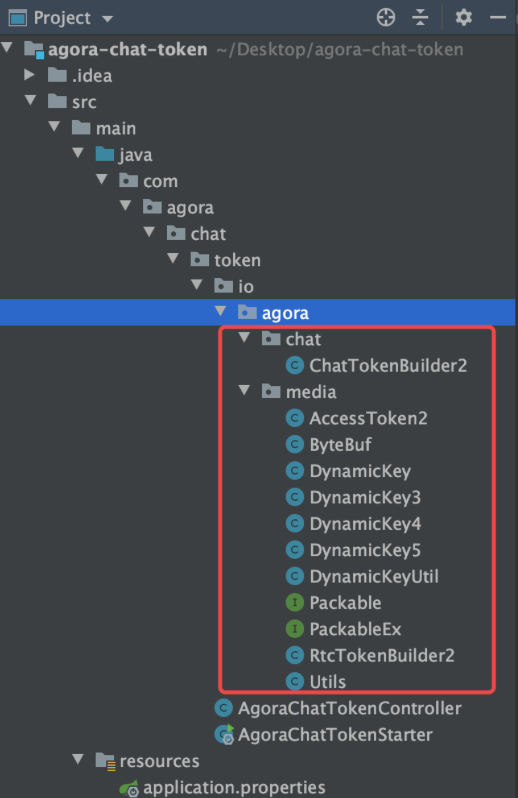
- Copy the
chat and media packages and paste them under com.agora.chat.token.io.agora. Now the project structure is as following screenshot shows:
- Fix the import errors in the
chat/ChatTokenBuilder2 and media/AccessToken files.
- In
ChatTokenBuilder2, change package io.agora.chat; to package com.agora.chat.token.io.agora.chat; and change import io.agora.media.AccessToken2; to import com.agora.chat.token.io.agora.media.AccessToken2;.
- In all files of the
com.agora.chat.token.io.agora.media package, change package io.agora.media; to package com.agora.chat.token.io.agora.media;.
- In
AccessToken, change import static io.agora.media.Utils.crc32; to import static com.agora.chat.token.io.agora.media.Utils.crc32;.
-
In <Project name>/src/main/resource, create an application.properties file to store the information for generating tokens and update it with your project information and token validity period. For example, set expire.second as 6000, which means the token is valid for 6000 seconds.
_12## Fill the App ID of your Agora project.
_12## Fill the app certificate of your Agora project.
_12## Set the token validity period (in second).
_12## Fill the App Key of your Agora project.
_12## Set the domain of Agora Chat RESTful APIs.
-
In the com.agora.chat.token package, create a Java class named AgoraChatTokenController with the following content:
_141 package com.agora.chat.token;
_141 import com.agora.chat.token.io.agora.chat.ChatTokenBuilder2;
_141 import com.agora.chat.token.io.agora.media.AccessToken2;
_141 import org.springframework.beans.factory.annotation.Value;
_141 import org.springframework.http.*;
_141 import org.springframework.util.StringUtils;
_141 import org.springframework.web.bind.annotation.CrossOrigin;
_141 import org.springframework.web.bind.annotation.GetMapping;
_141 import org.springframework.web.bind.annotation.PathVariable;
_141 import org.springframework.web.bind.annotation.RestController;
_141 import org.springframework.web.client.RestClientException;
_141 import org.springframework.web.client.RestTemplate;
_141 import java.util.Collections;
_141 import java.util.HashMap;
_141 import java.util.List;
_141 import java.util.Map;
_141 public class AgoraChatTokenController {
_141 private String appid;
_141 @Value("${appcert}")
_141 private String appcert;
_141 @Value("${expire.second}")
_141 private String appkey;
_141 private String domain;
_141 private final RestTemplate restTemplate = new RestTemplate();
_141 // Gets a token with app privileges.
_141 @GetMapping("/chat/app/token")
_141 public String getAppToken() {
_141 if (!StringUtils.hasText(appid) || !StringUtils.hasText(appcert)) {
_141 return "appid or appcert is not empty";
_141 // Generates a token with app privileges.
_141 AccessToken2 accessToken = new AccessToken2(appid, appcert, expire);
_141 AccessToken2.Service serviceChat = new AccessToken2.ServiceChat();
_141 serviceChat.addPrivilegeChat(AccessToken2.PrivilegeChat.PRIVILEGE_CHAT_APP, expire);
_141 accessToken.addService(serviceChat);
_141 return accessToken.build();
_141 } catch (Exception e) {
_141 e.printStackTrace();
_141 // Gets a token with user privileges.
_141 @GetMapping("/chat/user/{chatUserName}/token")
_141 public String getChatUserToken(@PathVariable String chatUserName) {
_141 if (!StringUtils.hasText(appid) || !StringUtils.hasText(appcert)) {
_141 return "appid or appcert is not empty";
_141 if (!StringUtils.hasText(appkey) || !StringUtils.hasText(domain)) {
_141 return "appkey or domain is not empty";
_141 if (!appkey.contains("#")) {
_141 return "appkey is illegal";
_141 if (!StringUtils.hasText(chatUserName)) {
_141 return "chatUserName is not empty";
_141 ChatTokenBuilder2 builder = new ChatTokenBuilder2();
_141 String chatUserUuid = getChatUserUuid(chatUserName);
_141 if (chatUserUuid == null) {
_141 chatUserUuid = registerChatUser(chatUserName);
_141 // Generates a token with user privileges.
_141 AccessToken2 accessToken = new AccessToken2(appid, appcert, expire);
_141 AccessToken2.Service serviceChat = new AccessToken2.ServiceChat(chatUserUuid);
_141 serviceChat.addPrivilegeChat(AccessToken2.PrivilegeChat.PRIVILEGE_CHAT_USER, expire);
_141 accessToken.addService(serviceChat);
_141 return accessToken.build();
_141 } catch (Exception e) {
_141 e.printStackTrace();
_141 // Gets the UUID of the user.
_141 private String getChatUserUuid(String chatUserName) {
_141 String orgName = appkey.split("#")[0];
_141 String appName = appkey.split("#")[1];
_141 String url = "http://" + domain + "/" + orgName + "/" + appName + "/users/" + chatUserName;
_141 HttpHeaders headers = new HttpHeaders();
_141 headers.setAccept(Collections.singletonList(MediaType.APPLICATION_JSON));
_141 headers.setBearerAuth(getAppToken());
_141 HttpEntity<Map<String, String>> entity = new HttpEntity<>(null, headers);
_141 ResponseEntity<Map> responseEntity = null;
_141 responseEntity = restTemplate.exchange(url, HttpMethod.GET, entity, Map.class);
_141 } catch (Exception e) {
_141 System.out.println("get chat user error : " + e.getMessage());
_141 if (responseEntity != null) {
_141 List<Map<String, Object>> results = (List<Map<String, Object>>) responseEntity.getBody().get("entities");
_141 return (String) results.get(0).get("uuid");
_141 // Creates a user with the password "123", and gets UUID.
_141 private String registerChatUser(String chatUserName) {
_141 String orgName = appkey.split("#")[0];
_141 String appName = appkey.split("#")[1];
_141 String url = "http://" + domain + "/" + orgName + "/" + appName + "/users";
_141 HttpHeaders headers = new HttpHeaders();
_141 headers.setContentType(MediaType.APPLICATION_JSON);
_141 headers.setAccept(Collections.singletonList(MediaType.APPLICATION_JSON));
_141 headers.setBearerAuth(getAppToken());
_141 Map<String, String> body = new HashMap<>();
_141 body.put("username", chatUserName);
_141 body.put("password", "123");
_141 HttpEntity<Map<String, String>> entity = new HttpEntity<>(body, headers);
_141 ResponseEntity<Map> response;
_141 response = restTemplate.exchange(url, HttpMethod.POST, entity, Map.class);
_141 } catch (Exception e) {
_141 throw new RestClientException("register chat user error : " + e.getMessage());
_141 List<Map<String, Object>> results = (List<Map<String, Object>>) response.getBody().get("entities");
_141 return (String) results.get(0).get("uuid");
-
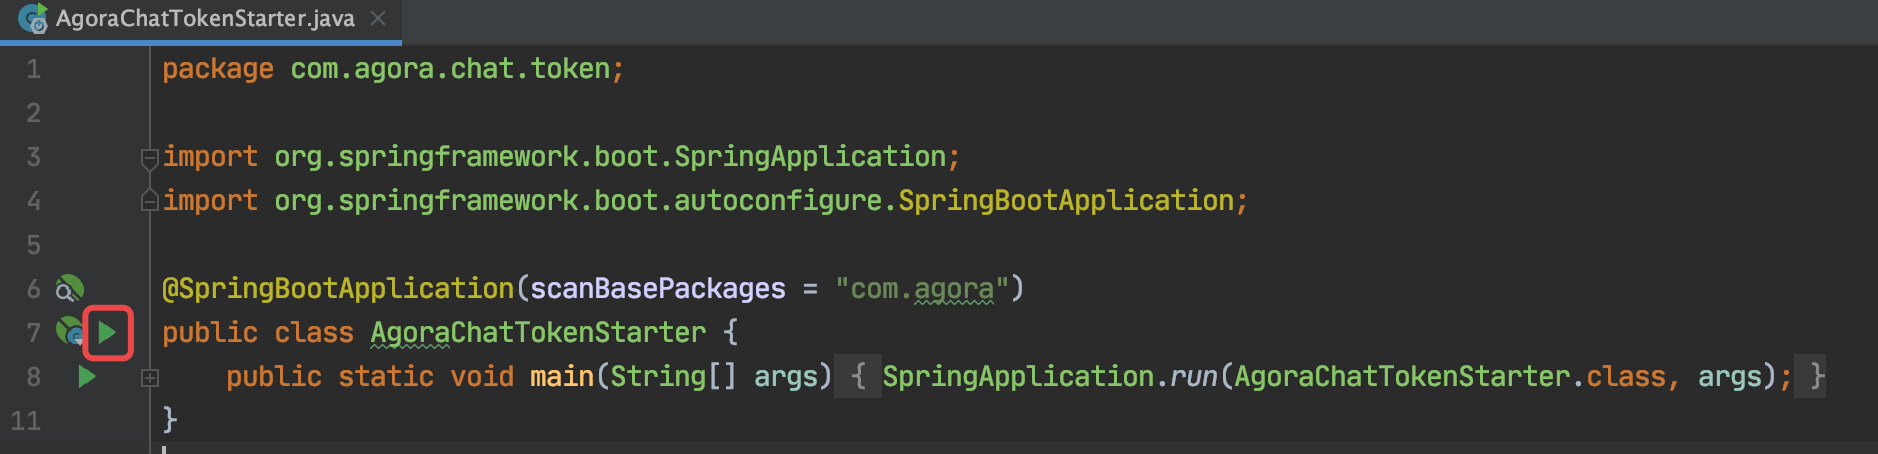
In the com.agora.chat.token package, create a Java class named AgoraChatTokenStarter with the following content:
_11package com.agora.chat.token;
_11import org.springframework.boot.SpringApplication;
_11import org.springframework.boot.autoconfigure.SpringBootApplication;
_11@SpringBootApplication(scanBasePackages = "com.agora")
_11public class AgoraChatTokenStarter {
_11 public static void main(String[] args) {
_11 SpringApplication.run(AgoraChatTokenStarter.class, args);
-
To start the server, click the green triangle button, and select Debug "AgoraChatTokenStarter...".
This section introduces how to get a token with app privileges and call the Agora Chat RESTful APIs to create a user in your app.
The core methods for generating a token with app privileges in the app server are as follows:
_12// Generates a token with app privileges. The parameters `appid`, `appcert`, and `expire` refer to App ID, App certificate, and token validity period respectively.
_12AccessToken2 accessToken = new AccessToken2(appid, appcert, expire);
_12AccessToken2.Service serviceChat = new AccessToken2.ServiceChat();
_12serviceChat.addPrivilegeChat(AccessToken2.PrivilegeChat.PRIVILEGE_CHAT_APP, expire);
_12accessToken.addService(serviceChat);
_12 return accessToken.build();
_12} catch (Exception e) {
-
Get a token for Agora Chat. In the terminal, use the following curl command to send a GET request to your app server to get a token.
_1curl http://localhost:8090/chat/app/token
Your app server returns a token like the following example:
_1007eJxTYPj3p2Tnb4tznzxfO/0LK5cu/GZmI71PnWPVkbVhP/aniEspMBhbJJqnGKclmVsYJ5kYWBhbJqcapqRZpJmbm5ikGRsnnT12OrGhN5pB97zpVEYGVgZGBiYGEJ+BAQBN0CGG
-
Call the Agora Chat RESTful APIs to create a new user. In the terminal, use the following curl command to send the request of creating a new user to the Agora Chat server.
_7curl -X POST -H "Authorization: Bearer <YourAgoraAppToken>" -i "https://XXXX/XXXX/XXXX/users" -d '[
_7 "nickname": "testuser"
The response parameters contains the information of the new user as shown in the following example:
_21 "application": "8be024f0-e978-11e8-b697-5d598d5f8402",
_21 "uri": "https://a1.agora.com/XXXX/XXXX/users",
_21 "uuid": "0ffe2d80-ed76-11e8-8d66-279e3e1c214b",
_21 "created": 1542795196504,
_21 "modified": 1542795196504,
_21 "nickname": "testuser"
_21 "timestamp": 1542795196515,
_21 "organization": "XXXX",
_21 "applicationName": "XXXX"
This section uses the Web client as an example to show how to use a token for client-side user authentication.
The core methods of generating a token with user privileges in the app server are as follows:
_13// Generates a token with app privileges. The parameters `appid`, `appcert`, `expire` and `chatUserUuid` refer to App ID, App certificate, token validity period and UUID of the Agora Chat user respectively.
_13AccessToken2 accessToken = new AccessToken2(appid, appcert, expire);
_13AccessToken2.Service serviceChat = new AccessToken2.ServiceChat(chatUserUuid);
_13serviceChat.addPrivilegeChat(AccessToken2.PrivilegeChat.PRIVILEGE_CHAT_USER, expire);
_13accessToken.addService(serviceChat);
_13 return accessToken.build();
_13} catch (Exception e) {
To show the authentication workflow, this section shows how to build and run a Web client on your local machine.
This sample client is for demonstration purposes only. Do not use it in a production environment.
To implement the Web client, do the following:
-
Create a project structure for an Agora Chat Web app. In the project root folder, create the following files:
index.html: The user interface.index.js: The app logic.webpack.config.js: The webpack configuration.
-
To configure webpack, copy the following code into webpack.config.js:
_15 const path = require('path');
_15 filename: 'bundle.js',
_15 path: path.resolve(__dirname, './dist'),
-
Set up the npm package for your Web app. In the terminal, navigate to the project root directory and run npm init. This creates a package.json file.
-
Configure the dependencies for your project. Copy the following code into the package.json file.
_21 "build": "webpack --config webpack.config.js",
_21 "start:dev": "webpack serve --open --config webpack.config.js"
_21 "agora-chat-sdk": "latest"
_21 "webpack": "^5.50.0",
_21 "webpack-cli": "^4.8.0",
_21 "webpack-dev-server": "^3.11.2"
-
Create the UI. Replace the code in the index.html file with the following code:
_19 <title>Agora Chat Token demo</title>
_19 <div class="input-field">
_19 <label>Username</label>
_19 <input type="text" placeholder="Username" id="username" />
_19 <button type="button" id="login">Login</button>
_19 <script src="./dist/bundle.js"></script>
-
Create the app logic.
In index.js, add the following code and replace <Your App Key> with your app key.
_65import WebIM from "agora-chat-sdk";
_65WebIM.conn = new WebIM.connection({
_65 appKey: "<Your App Key>",
_65// Logs in to Agora Chat.
_65document.getElementById("login").onclick = function () {
_65 username = document.getElementById("username").value.toString();
_65 // Use the user name to gets a token with user privileges.
_65 fetch(`http://localhost:8090/chat/user/${username}/token`)
_65 .then((res) => res.text())
_65 // Logs in to Agora Chat using the user name and the token with user privileges.
_65// Adds an event handler.
_65WebIM.conn.addEventHandler("AUTHHANDLER", {
_65// The event handler for successfully connecting to the server.
_65 .getElementById("log")
_65 .appendChild(document.createElement("div"))
_65 .append("Connect success !");
_65// The event handler for receiving a text message.
_65 onTextMessage: (message) => {
_65 console.log(message);
_65 .getElementById("log")
_65 .appendChild(document.createElement("div"))
_65 .append("Message from: " + message.from + " Message: " + message.data);
_65 // The event handler for the token about to expire.
_65 onTokenWillExpire: (params) => {
_65 .getElementById("log")
_65 .appendChild(document.createElement("div"))
_65 .append("Token is about to expire");
_65 refreshToken(username);
_65 // The event handler for the token already expired.
_65 onTokenExpired: (params) => {
_65 .getElementById("log")
_65 .appendChild(document.createElement("div"))
_65 .append("The token has expired");
_65 refreshToken(username);
_65 onError: (error) => {
_65 console.log("on error", error);
_65function refreshToken(username) {
_65 fetch(`http://localhost:8090/chat/user/${username}/token`)
_65 .then((res) => res.text())
_65 WebIM.conn.renewToken(token);
In the code example, you can see that token is related to the following code logic in the client:
- Call
open to log in to the Agora Chat system with token and username. You must use the username that is used to register the user and get the UUID.
- Fetch a new token from the app server and call
renewToken to update the token of the SDK when the token is about to expire and when the token expires. Agora recommends that you regularly (such as every hour) generate a token from the app server and call renewToken to update the token of the SDK to ensure that the token is always valid.
-
To build and run your project, do the following:
-
To install the dependencies, run npm install.
-
To build and run the project using webpack, run the following commands:
_5# Use webpack to package the project
_5# Use webpack-dev-server to run the project
The index.html page opens in your browser.
-
Input a user name and click the login button.
Open the browser console, and you can see the web client performs the following actions:
- Generates a token with user privileges.
- Connects to the Agora Chat system.
- Renews a token when it is about to expire.
This section introduces token generator libraries, version requirements, and related documents about tokens.
Agora Chat provides an open-source AgoraDynamicKey repository on GitHub, which enables you to generate tokens on your server with programming languages such as C++, Java, and Go.
This section introduces the method to generate a token for Agora Chat. Take Java as an example:
A token for Agora Chat is valid for a maximum of 24 hours.
When a privilege is about to expire or has expired, the RTC SDK triggers the onTokenWillExpire callback or the onTokenExpired callback. You need to take the following actions in your own app logic:
- Tag the type of privilege that is about to expire or has expired in your app logic.
- The app fetches a new AccessToken2 from the token server.
- The SDK calls
renewToken to renew the AccessToken2.
If you use Agora Chat together with the Agora RTC SDK, Agora recommends you upgrade to AccessToken 2.