Secure authentication with tokens
Authentication is the act of validating the identity of each user before they access a system. Agora uses digital tokens to authenticate users and their privileges before they access Agora SD-RTN™ to join Cloud Recording. Each token is valid for a limited period and works only for a specific channel. For example, you cannot use the token generated for a channel called AgoraChannel to join the AppTest channel.
This page shows you how to quickly set up an authentication token server, retrieve a token from the server, and use it to connect securely to a specific Cloud Recording channel. You use this server for development purposes. To see how to develop your own token generator and integrate it into your production IAM system, read Token generators.
Understand the tech
An authentication token is a dynamic key that is valid for a maximum of 24 hours. On request, a token server returns an authentication token that is valid to join a specific channel.
When users attempt to connect to an Agora channel from your app, your app retrieves a token from the token server in your security infrastructure. Your app then sends this token to Agora SD-RTN™ for authentication. Agora SD-RTN™ validates the token and reads the user and project information stored in the token. A token contains the following information:
-
The App ID of your Agora project
-
The App certificate of your Agora project
-
The channel name
-
The user ID of the user to be authenticated (optional)
-
The privilege of the user, either as a publisher or a subscriber
-
The Unix timestamp showing when the token will expire
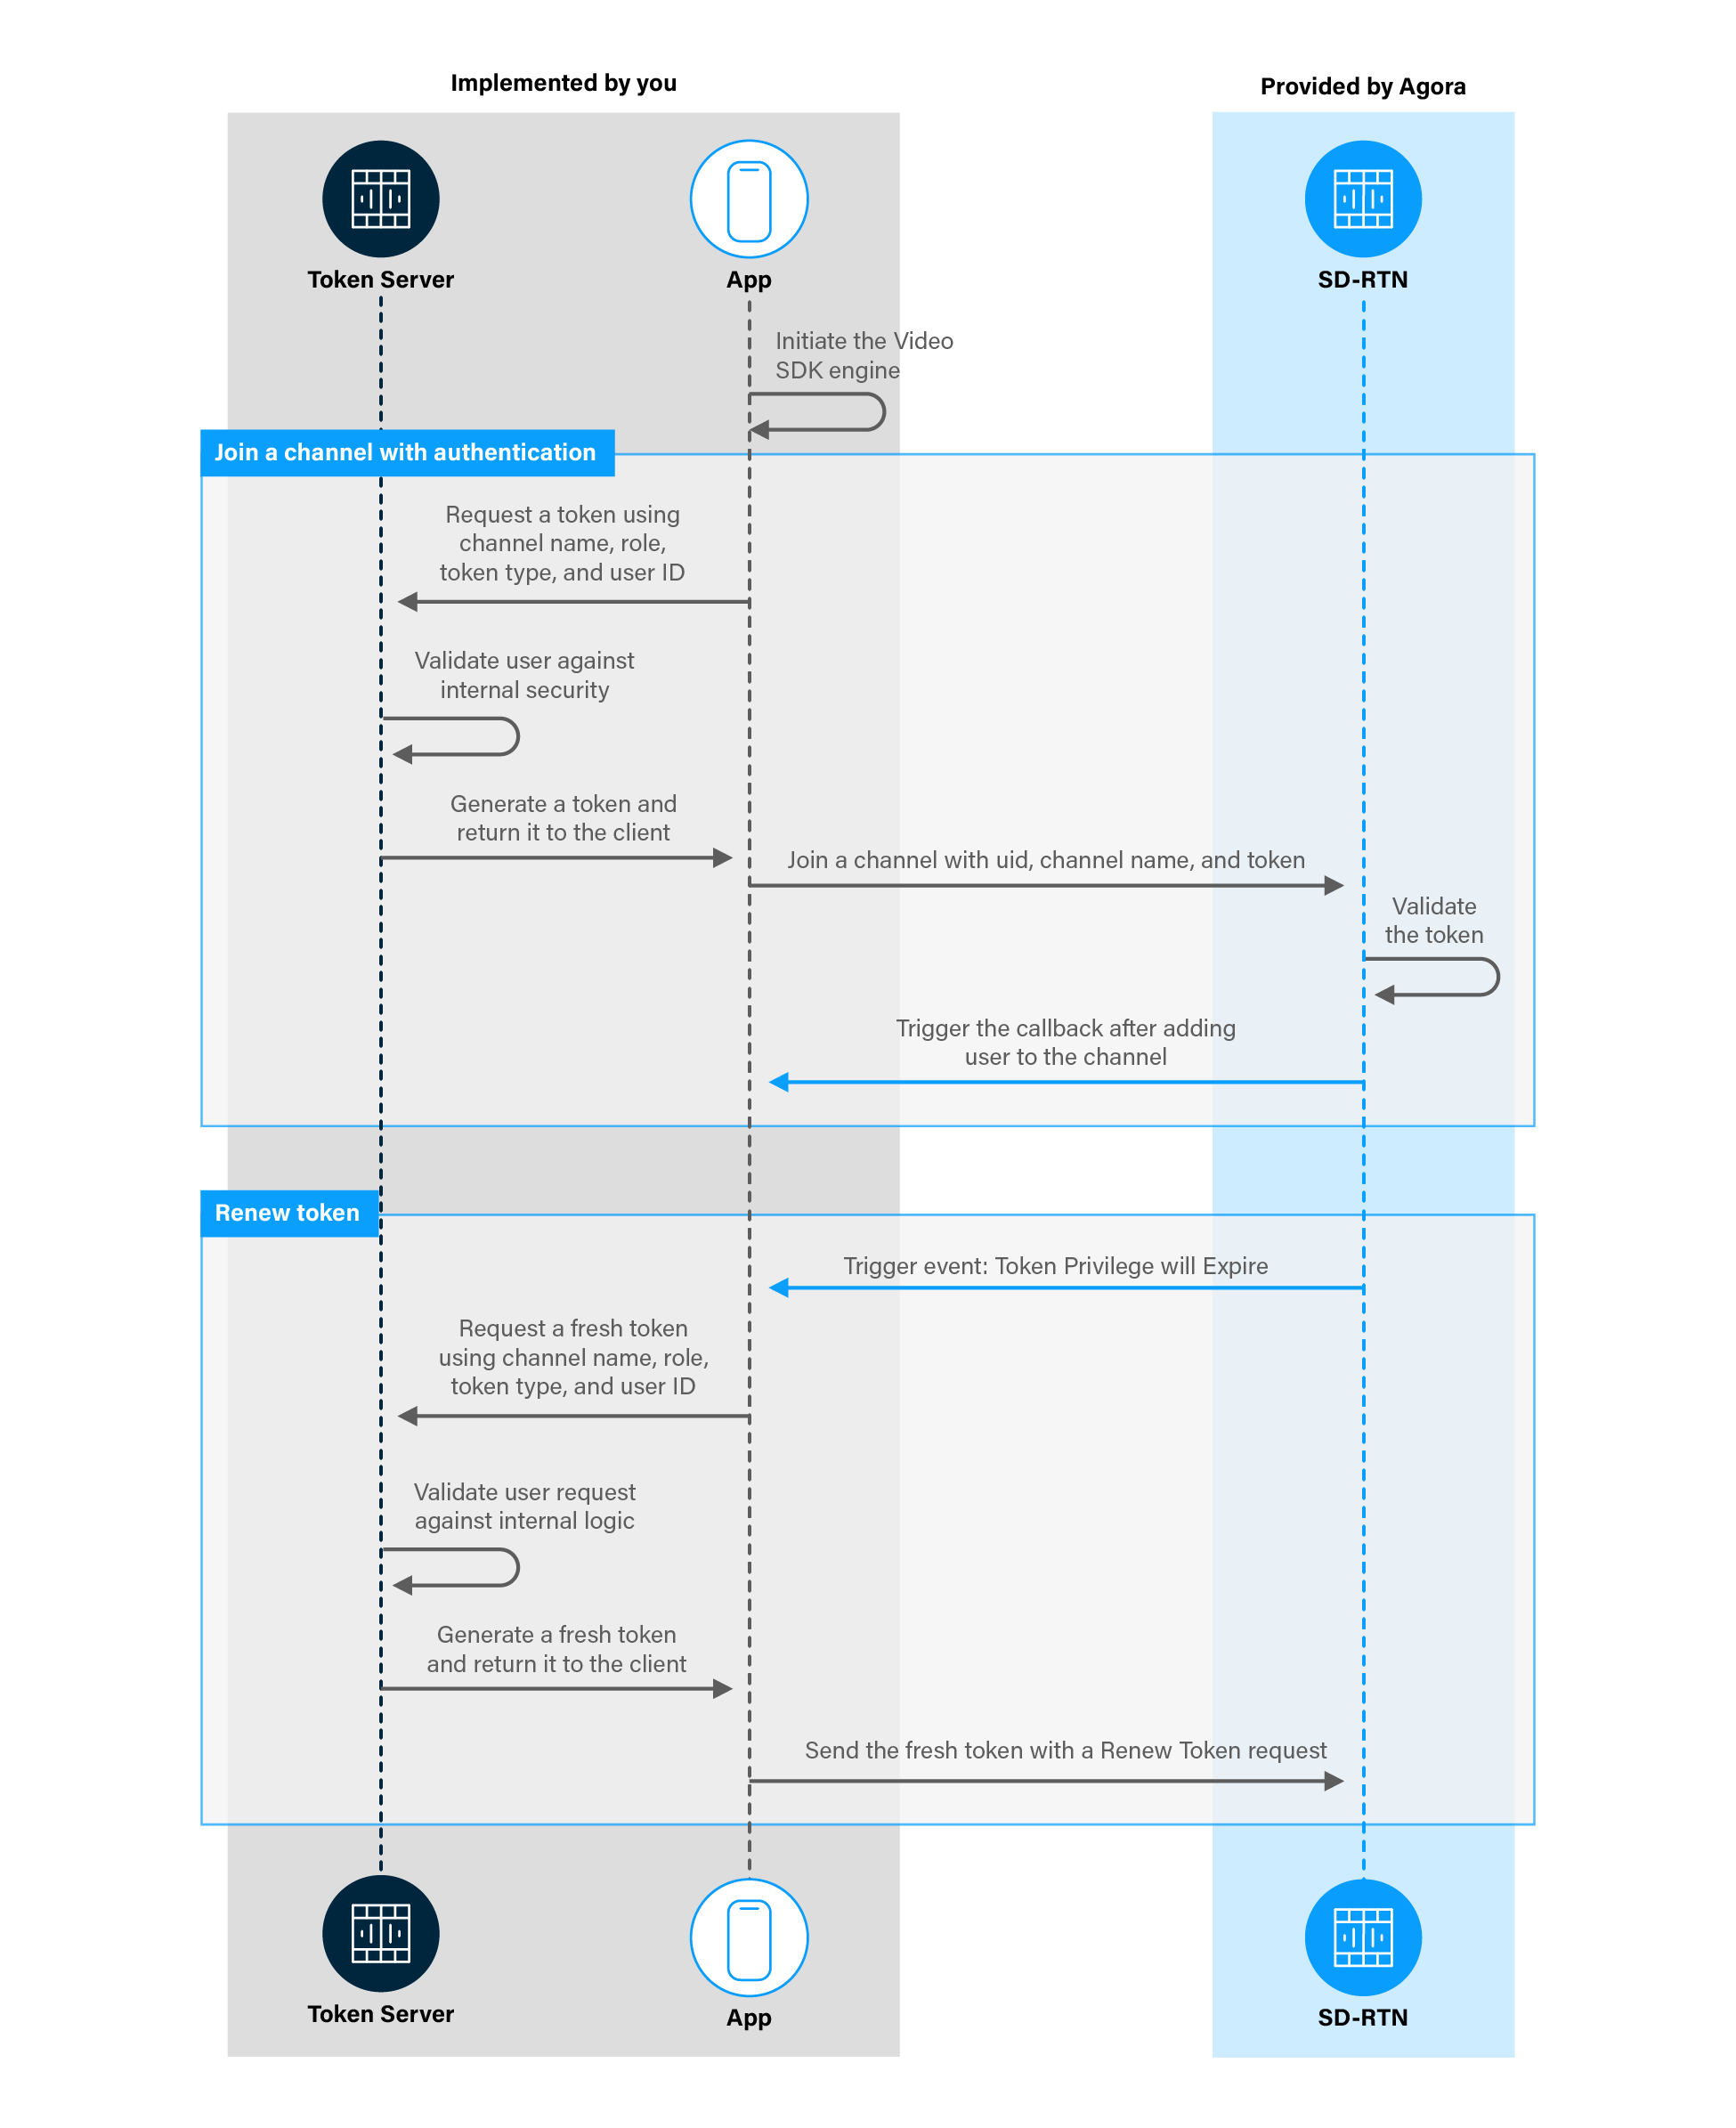
The following figure shows the call flow you need to implement to create step-up-authentication with Agora Cloud Recording:
Prerequisites
To follow this procedure the reader is suggested to have:
- Implemented the Quickstart
- Created a Railway account and get it verified by your github account
- If you want to integrate a token generator directly into your security infrastructure, see Token generators.
- Android Studio 4.1 or higher.
- Android SDK API Level 24 or higher.
- A mobile device that runs Android 4.1 or higher.
-
A computer with Internet access.
Ensure that no firewall is blocking your network communication.
Project setup
To integrate token authentication into your app, do the following:
- Open the project you created in the:
- Log in to your Railway account.
Implement the authentication workflow
In the SDK quickstart project you implemented, the app uses an authentication token obtained manually from Agora Console to join a channel. In a production environment, your app retrieves this token from a token server. This section shows you how to:
- Create and run a token server
- Retrieve and use tokens from a token server
Create and run a token server
This section shows you how to deploy a token server on Railway.
-
Click here and deploy a token server to Railway.
Railway retrieves the project code and necessary files from Github, then takes you to the Deploy Agora Token Deployment page. On this page, fill in the following information:
-
Github account: The GitHub account where Railway should clone the token deployment repository. -
Repository name: The name of the cloned repository, the default isagora-token-service. -
Private repository: Select this option to hide this repoisitory. -
APP_CERTIFICATE: The obtained from Agora Console. -
APP_ID: The App ID obtained from Agora Console.
-
-
Click Deploy. Railway configures and builds the token server.
The deployment turn green once it is complete.
-
Click the URL.
Railway opens the token server URL in your browser. The URL is of the form
agora-token-service-production-<id>.up.railway.app, where<id>is a random alphanumeric string.Don’t worry if you see
404 page not foundin your browser. Follow the next steps and test your server. -
Test your server
-
Retrieve a token
To retrieve an Video SDK token, send a request to the token server using a URL based on the Token server GET request structure:
For example:
https://agora-token-service-production-92ff.up.railway.app/rtc/MyChannel/1/uid/1/?expiry=300Your token server returns a JSON object containing the encyrpted token:
-
Authentication using UI Kit
To retrieve tokens from the token server and use them to authenticate your app with Agora SD-RTN™ using UI Kit
-
Specify the token server URL
In the
MainActivityclass, declare the following variable to hold the token server URL.Make sure you specify the token-server URL in exactly the same format as shown in the example.
-
Set the token URL for AgoraVideoViewer
To set the token URL, you create an
AgoraSettingsobject, set itsTokenURLproperty and pass this object to the constructor when initializingAgoraVideoViewer. To do this, replace the code in thetry {…}block of theinitializeAndJoinChannel()method with the following: -
Fetch a token from the server when you join a channel
In the
joinChannel()method, replace theagView.joincall with the following:
Authentication using Video SDK
To retrieve tokens from the token server and use them to authenticate your app with Agora SD-RTN™ using Video SDK
-
Add the necessary dependencies
In order to make HTTPS calls to a token server and interpret the JSON return parameters, integrate the
OkHttpclient andGsonlibrary into your Android project. In/Gradle Scripts/build.gradle (Module: <projectname>.app), add the following lines underdependencies. -
Allow cleartext network traffic
Add the following line in
/app/Manifests/AndroidManifest.xml, under<application: -
Enable the user to specify a channel name
Add a text box to the user interface. In
/app/res/layout/activity_main.xmladd the following lines before</RelativeLayout>: -
Add the required import statements
In
/app/java/com.example.<projectname>/MainActivity, add the following lines after the lastimportstatement: -
Add variables for your connection to the token server
Declare the variables you need to specify the user id, token role, token server URL and the token expire time. Add the following declarations to the
MainActivityclass afterprivate RtcEngine agoraEngine;Make sure you specify the token server URL in exactly the same format as shown in the example.
-
Set up access to the channel name text box from code
Add the following line at the end of the
onCreatemethod,. -
Retrieve a token from the server
Use a GET request to retrieve an authentication token for a specific channel from the token server, then decode the return parameters.
In the
MainActivityclass, add the followingfetchTokenmethod: -
Join a channel using the token
Use the retrieved token to either join a channel or to renew an expiring token.
In the
MainActivityclass, add the followingsetTokenmethod: -
Handle the event triggered by Agora SD-RTN™ when the token is about to expire
A token expires after the
expireTimespecified in the call to the token server or expires after 24 hours, if the time is not specified. TheonTokenPrivilegeWillExpireevent receives a callback when the current token is about to expire so that a fresh token may be retrieved and used.In the
MainActivityclass, add the following method afterprivate final IRtcEngineEventHandler mRtcEventHandler = new IRtcEngineEventHandler() { -
Update the
joinChannelmethod to fetch a tokenIn the
MainActivityclass, replace thejoinChannelmethod with the following:
Test your implementation
To ensure that you have implemented Agora token authentication workflow in your app:
-
Generate a token in Agora Console.
Users communicate securely using channels in the same project. The App ID you use to generate this token must be the same one you supplied to Railway.
-
In your browser, navigate to the Agora web demo and update App ID, Channel, and Token with the values for your temporary token, then click Join.
-
Set the variables in your app:
-
Update
appIDin the declarations to the value from Agora Console. -
Set
tokento an empty string in the declarations. -
Update
serverUrlin the declarations to the base address of your token server, for example,https://agora-token-service-production-92ff.up.railway.app. -
If you are developing with UI Kit: set
channelNameto the same Channel you specified in the web demo app.
-
-
Connect a physical Android device to your development device.
-
In Android Studio, click Run app. A moment later you see the project installed on your device.
If this is the first time you run the project, grant microphone and camera access to your app.
-
If you are developing with Video SDK: enter the same channel name in the UI text box that you used to connect to the Agora web demo.
-
Click Join to connect your Android app to the web demo app.
Your app magically connects to the same channel you used in web demo. You don’t need to hardcode a token in your app; each channel is secured with a specific token, and each token is refreshed automatically. That’s pretty cool!
Reference
This section contains information that completes the information in this page, or points you to documentation that explains other aspects to this product.
Source code for a token server
The token server RESTful web service used in this page is written in Golang using the Gin framework. Want to use the code in your authentication service? Download the token server source code and binaries for various platforms from Github.
To see how to create a token generator inside your IAM system, see Integrate a token generator.
Token server GET request structure
A token server GET request has the following structure:
-
:channelNameis the name of the Agora Channel you wish to joinA channel name may contain numbers with both upper and lower case letters. The name length must be less than 64 characters.
-
:roleis the user roleUse
publisherfor publisher,subscriberfor subscriber. -
:tokentypeis the type of tokenAgora SD-RTN™ supports both integer user IDs and string user accounts for token generation. To ensure smooth communication, all the users in a channel must use the same type of ID, that is, either the integer
uid, or a stringuserAccount. Best practice is to use theuid. -
:uidis the user IDUser Id can be any 32-bit unsigned integer. It can be set to 0, if you do not need to authenticate the user based on the user ID.
-
expireTime(optional) is the number of seconds after which the token will expireBy default, a token expires after 24 hours unless a shorter life span is explicitly specified in the token request.