Configure Flexible Classroom
This page introduces how to enable and configure Flexible Classroom in Agora Console.
Prerequisites
In order to follow this procedure you must have:
-
The whiteboard feature in Flexible Classroom requires third-party cloud storage. Currently, Flexible Classroom supports Amazon S3.
Enable Flexible Classroom
Follow these steps to enable the Flexible Classroom service in Agora Console:
-
Log into Agora Console and navigate to the Project Management page.
-
On the Project Management page, find the project for which you want to enable the Flexible Classroom service, and click Edit.
-
Under Extensions, find Flexible Classroom and click Enable.
-
Read the pop-up prompt carefully, and click Enable.
-
After you successfully enable the Flexible Classroom service, the status changes to Enabled:
Configure the whiteboard feature
If you want to upload PPT, Word, or PDF files to a Flexible Classroom and display these files on the whiteboard, you need to configure the whiteboard feature in Agora Console. Before configuring the whiteboard feature, ensure that you have enabled a third-party cloud storage service. Currently, Agora only supports Amazon S3.
To configure the whiteboard feature, take the following steps:
-
On the Flexible Classroom configuration page in Agora Console, find the whiteboard module:
-
To use PPT, Word, PDF and other courseware, you need to enable advanced services. Go to Configuration under Advanced Services to enable and configure the document-to-webpage, document-to-picture, and screenshot services for Smart Classroom. For details, see Enable whiteboard server-side features.
-
Configure a third-party cloud storage service for storing files uploaded in a classroom. Fill in the following information:
region: The location of the data center you specified when creating a bucket in Amazon S3.endpoint: The domain name used to access the Amazon S3 service, such as s3.us-east-2.amazonaws.com.Bucket: The bucket name in Amazon S3.folder: The domain name used to access the Amazon S3 service, such as whiteboard.accessKey: The Access Key provided by Amazon S3, which is used to identify visitors.secretKey: The Secret Key provided by Amazon S3, which is used to authenticate signatures.
For further information on how to obtain these parameters, see the Amazon S3 document.
Configure classroom storage and recording
To setup and configure storage and recording in for your classrooms:
-
Setup third-party cloud storage
-
On the Flexible Classroom configuration page, find the whiteboard module, as shown in the following figure:
-
Enable the advanced services. See Enable whiteboard server-side features.
-
Configure a third-party cloud storage service for storing files uploaded in a classroom. Fill in the following information:
region: The location of the data center you specified when creating a bucket in Amazon S3.endpoint: The domain name used to access the Amazon S3 service, such ass3.us-east-2.amazonaws.com.Bucket: The bucket name in Amazon S3.folder: The domain name used to access the Amazon S3 service, such aswhiteboard.accessKey: The Access Key provided by Amazon S3, which is used to identify visitors.secretKey: The Secret Key provided by Amazon S3, which is used to authenticate signatures.
For how to get these information, see the document of Amazon S3.
-
-
Configure your classroom
-
Find the cloud recording module on the Flexible Classroom configuration page in Agora Console:
-
Configure storage
Pass in the
storageConfigJSON object for storing recorded files. Use the following fields to specify the url and storage location of the recording file.-
endpoint: (required) String. The full path composed of the Bucket name and the access domain name. For example, if your Bucket name is "agora-recording", and the OSS access domain name is "oss-cn-shanghai.aliyuncs.com", then theendpointfield is set tohttps:// agora-recording.oss-cn-shanghai.aliyuncs.com -
fileNamePrefix: (Optional) JSONArray. An array of strings that sets the path of the recorded files in the third-party cloud storage. For example, iffileNamePrefix = ["directory1","directory2"], Agora Cloud Recording will add the prefixdirectory1/directory2/before the name of the recorded file. You can also use variables to specify a dynamic path.
Sample
storageConfig:To set the path dynamically, you can use these two types of variables:
Type Variable Description Fixed Variables ${appId}App ID ${roomUuid}The Uuid of the class to be recorded Date variables ${yyyy}Year ${MM}Month ${dd}Day ${yyyyMMdd}${yyyyMM}${yyyy-dd}${MM_dd}Date variables can be combined into different formats For example, you set
fileNamePrefixfield as follows:The recording storage path will be similar to
/scenario/recording/<appID>/202303/<roomUUiD>/filename.mp4.For complete parameter descriptions, see storageConfig.
-
-
Configure recording.
By default, you record teacher audio and video in composite recording mode. Your recorded files are stored in Agora's Amazon S3 account. To change the default behavior, Pass in the
recordingConfigJSON object:For parameter descriptions, see recordingConfig.
-
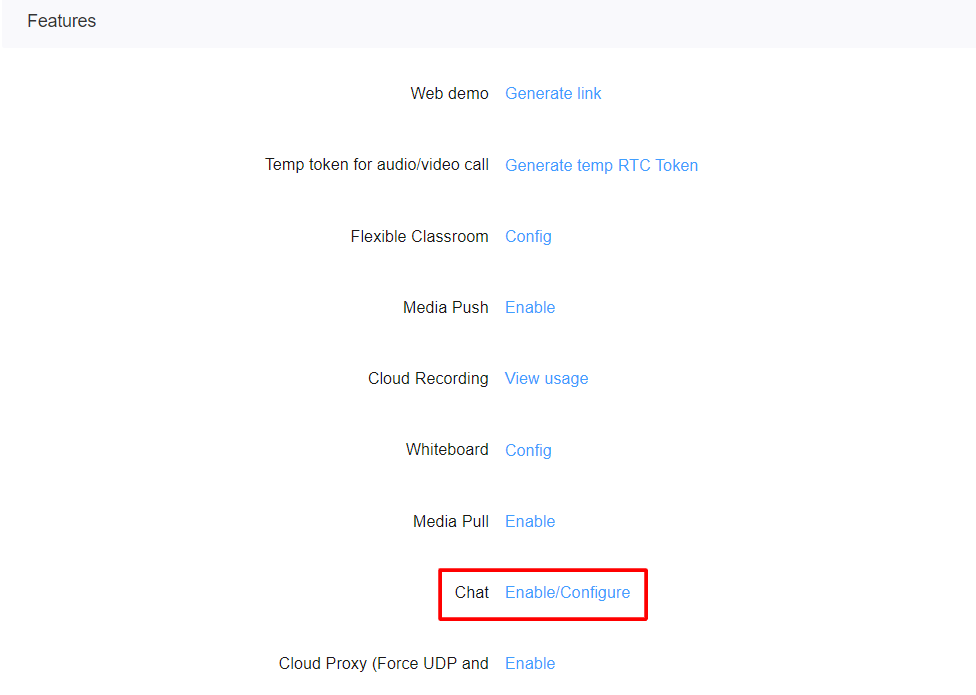
Configure Chat
To enable and configure Chat:
-
In Agora Console, navigate to Project Management.
-
Click Config next to the project for which you want to enable Chat.
-
In the Features section of the Edit Project page, click Enable/Configure next to Chat.
-
Select the data center location.
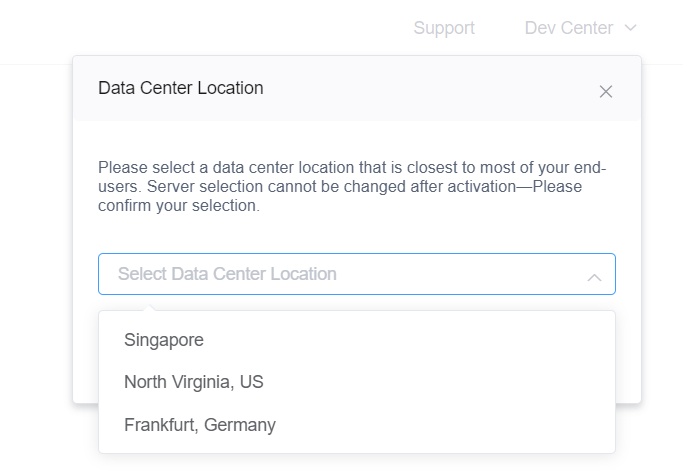
Agora generates the Chat-related
AppKey,OrgName,AppName, and API access information. -
In the Features section of the Edit Project page, click Config next to Flexible Classroom.
-
In the Chat section, complete the required fields:
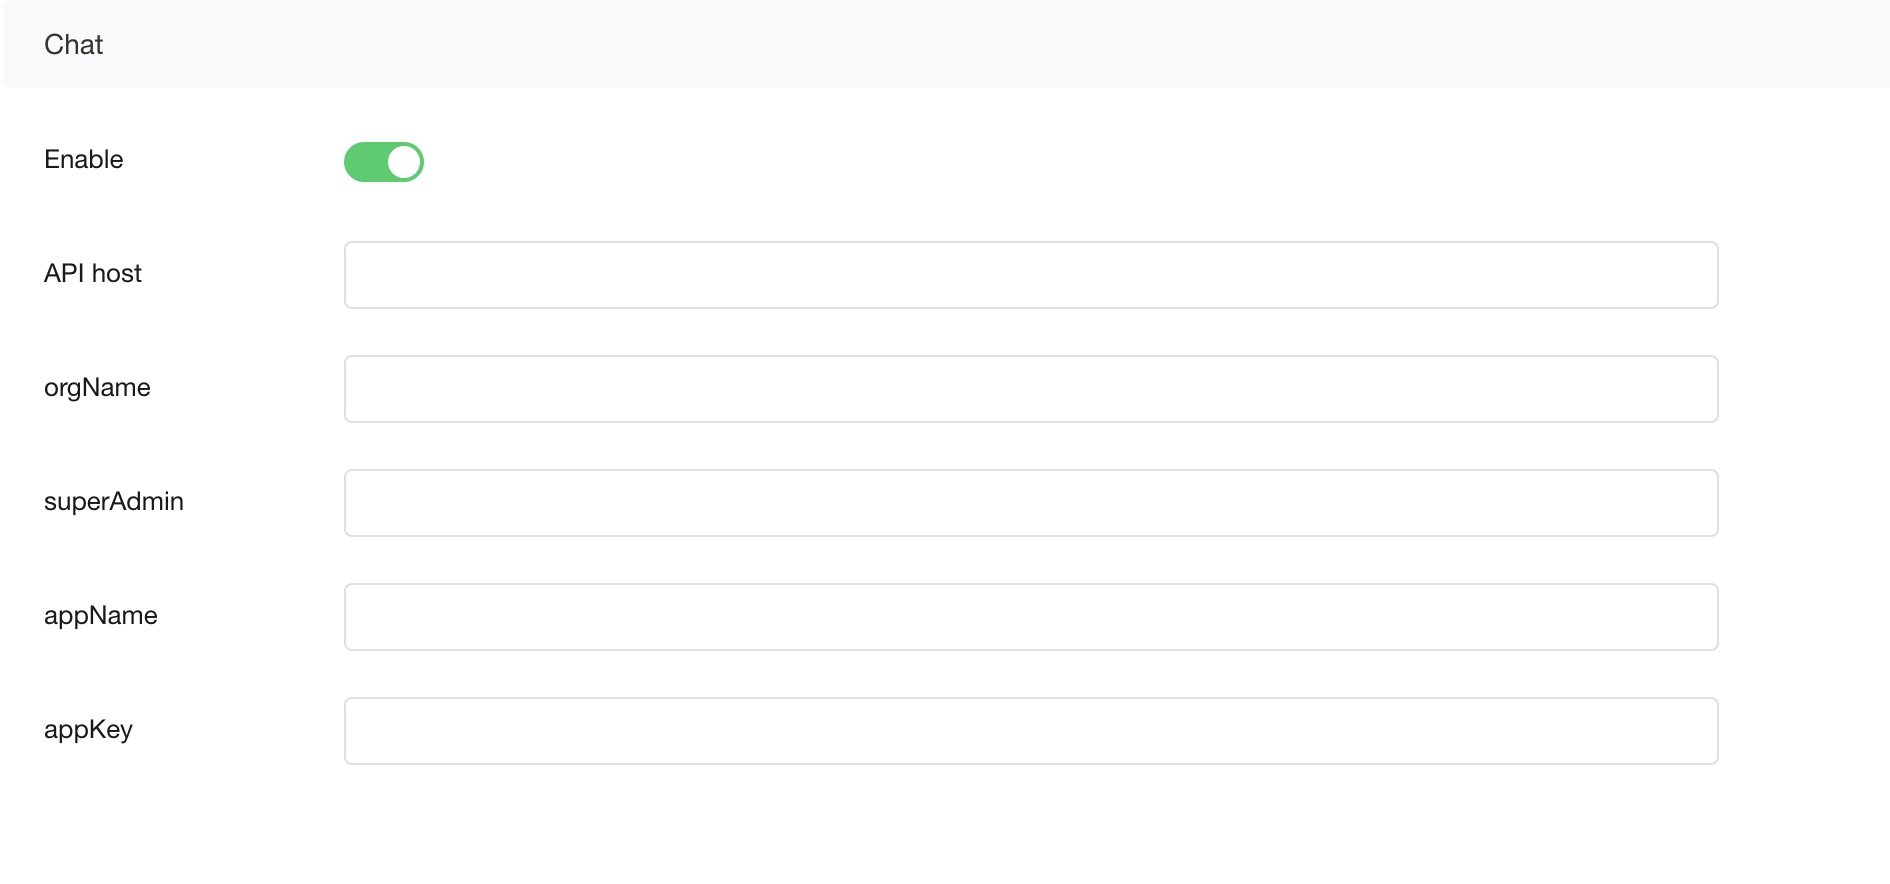
- API host: The REST API access address generated when enabling Chat.
- orgName: The unique identifier of the enterprise generated when enabling Chat.
- superAdmin: The super administrator username prefix. Only numbers and letters are supported. Agora uses
${superAdmin}-${timestamp}as the super administrator to create a chat room. - appName: The unique name of the app generated when enabling Chat.
- appKey: The unique identifier of the app generated when enabling Chat.
Considerations
To ensure that Agora can access files in your third-party cloud storage space, you should enable public access or higher permissions for third-party storage spaces.
AWS S3 account configuration
Configure your AWS S3 account as follows:
-
Bucket policy
-
Cross-origin resource sharing
Next steps
After enabling the Flexible Classroom service, see how to quickly launch a classroom.