Restricted network connection
You use Agora Cloud Proxy to ensure reliable connectivity for your users when they connect from an environment with a restricted network.
Understand the tech of Cloud Proxy
Agora recommends upgrading to the latest SDK version, which supports all three operating modes:
- Video SDK for Android v4.1.0
To accommodate your end users’ firewall settings and business needs, Cloud Proxy offers the following operating modes:
-
Automatic
The default setting. In the Automatic mode of Cloud Proxy, Video SDK first attempts a direct connection to Agora SD-RTN™; if the attempt fails, Video SDK automatically falls back and sends media securely on TCP/TLS 443. This is best practice when you are not sure if your end users are behind a firewall. Sending media over TCP/TLS 443 may not have as high quality UDP. However, a connection on TCP/TLS 443 works through most firewalls.
-
Force UDP
In the Force UDP mode of Cloud Proxy, Video SDK securely sends media over UDP only. Your end users’ firewall must be configured to trust a list of allowed IP address. This is best practice when your end users are behind a firewall and require media with the highest possible quality. This mode does not support pushing streams to the CDN or relaying streams across channels.
-
Force TCP
In the Force TCP mode of Cloud Proxy, Video SDK securely sends media over TCP/TLS 443 only. This is best practice when your end users are behind a firewall and the firewall’s security policies only allow media to flow through TCP/TLS 443. In some cases the firewall might trust any traffic over TCP/TLS 443. However, in many cases the firewall is configured to trust only a specific range of IP addresses sending traffic over TCP/TLS 443. In this case, your end user’s firewall must be configured to trust a list of allowed IP address. Media quality might be impacted if network conditions degrade.
The following figure shows the Cloud Proxy workflow:
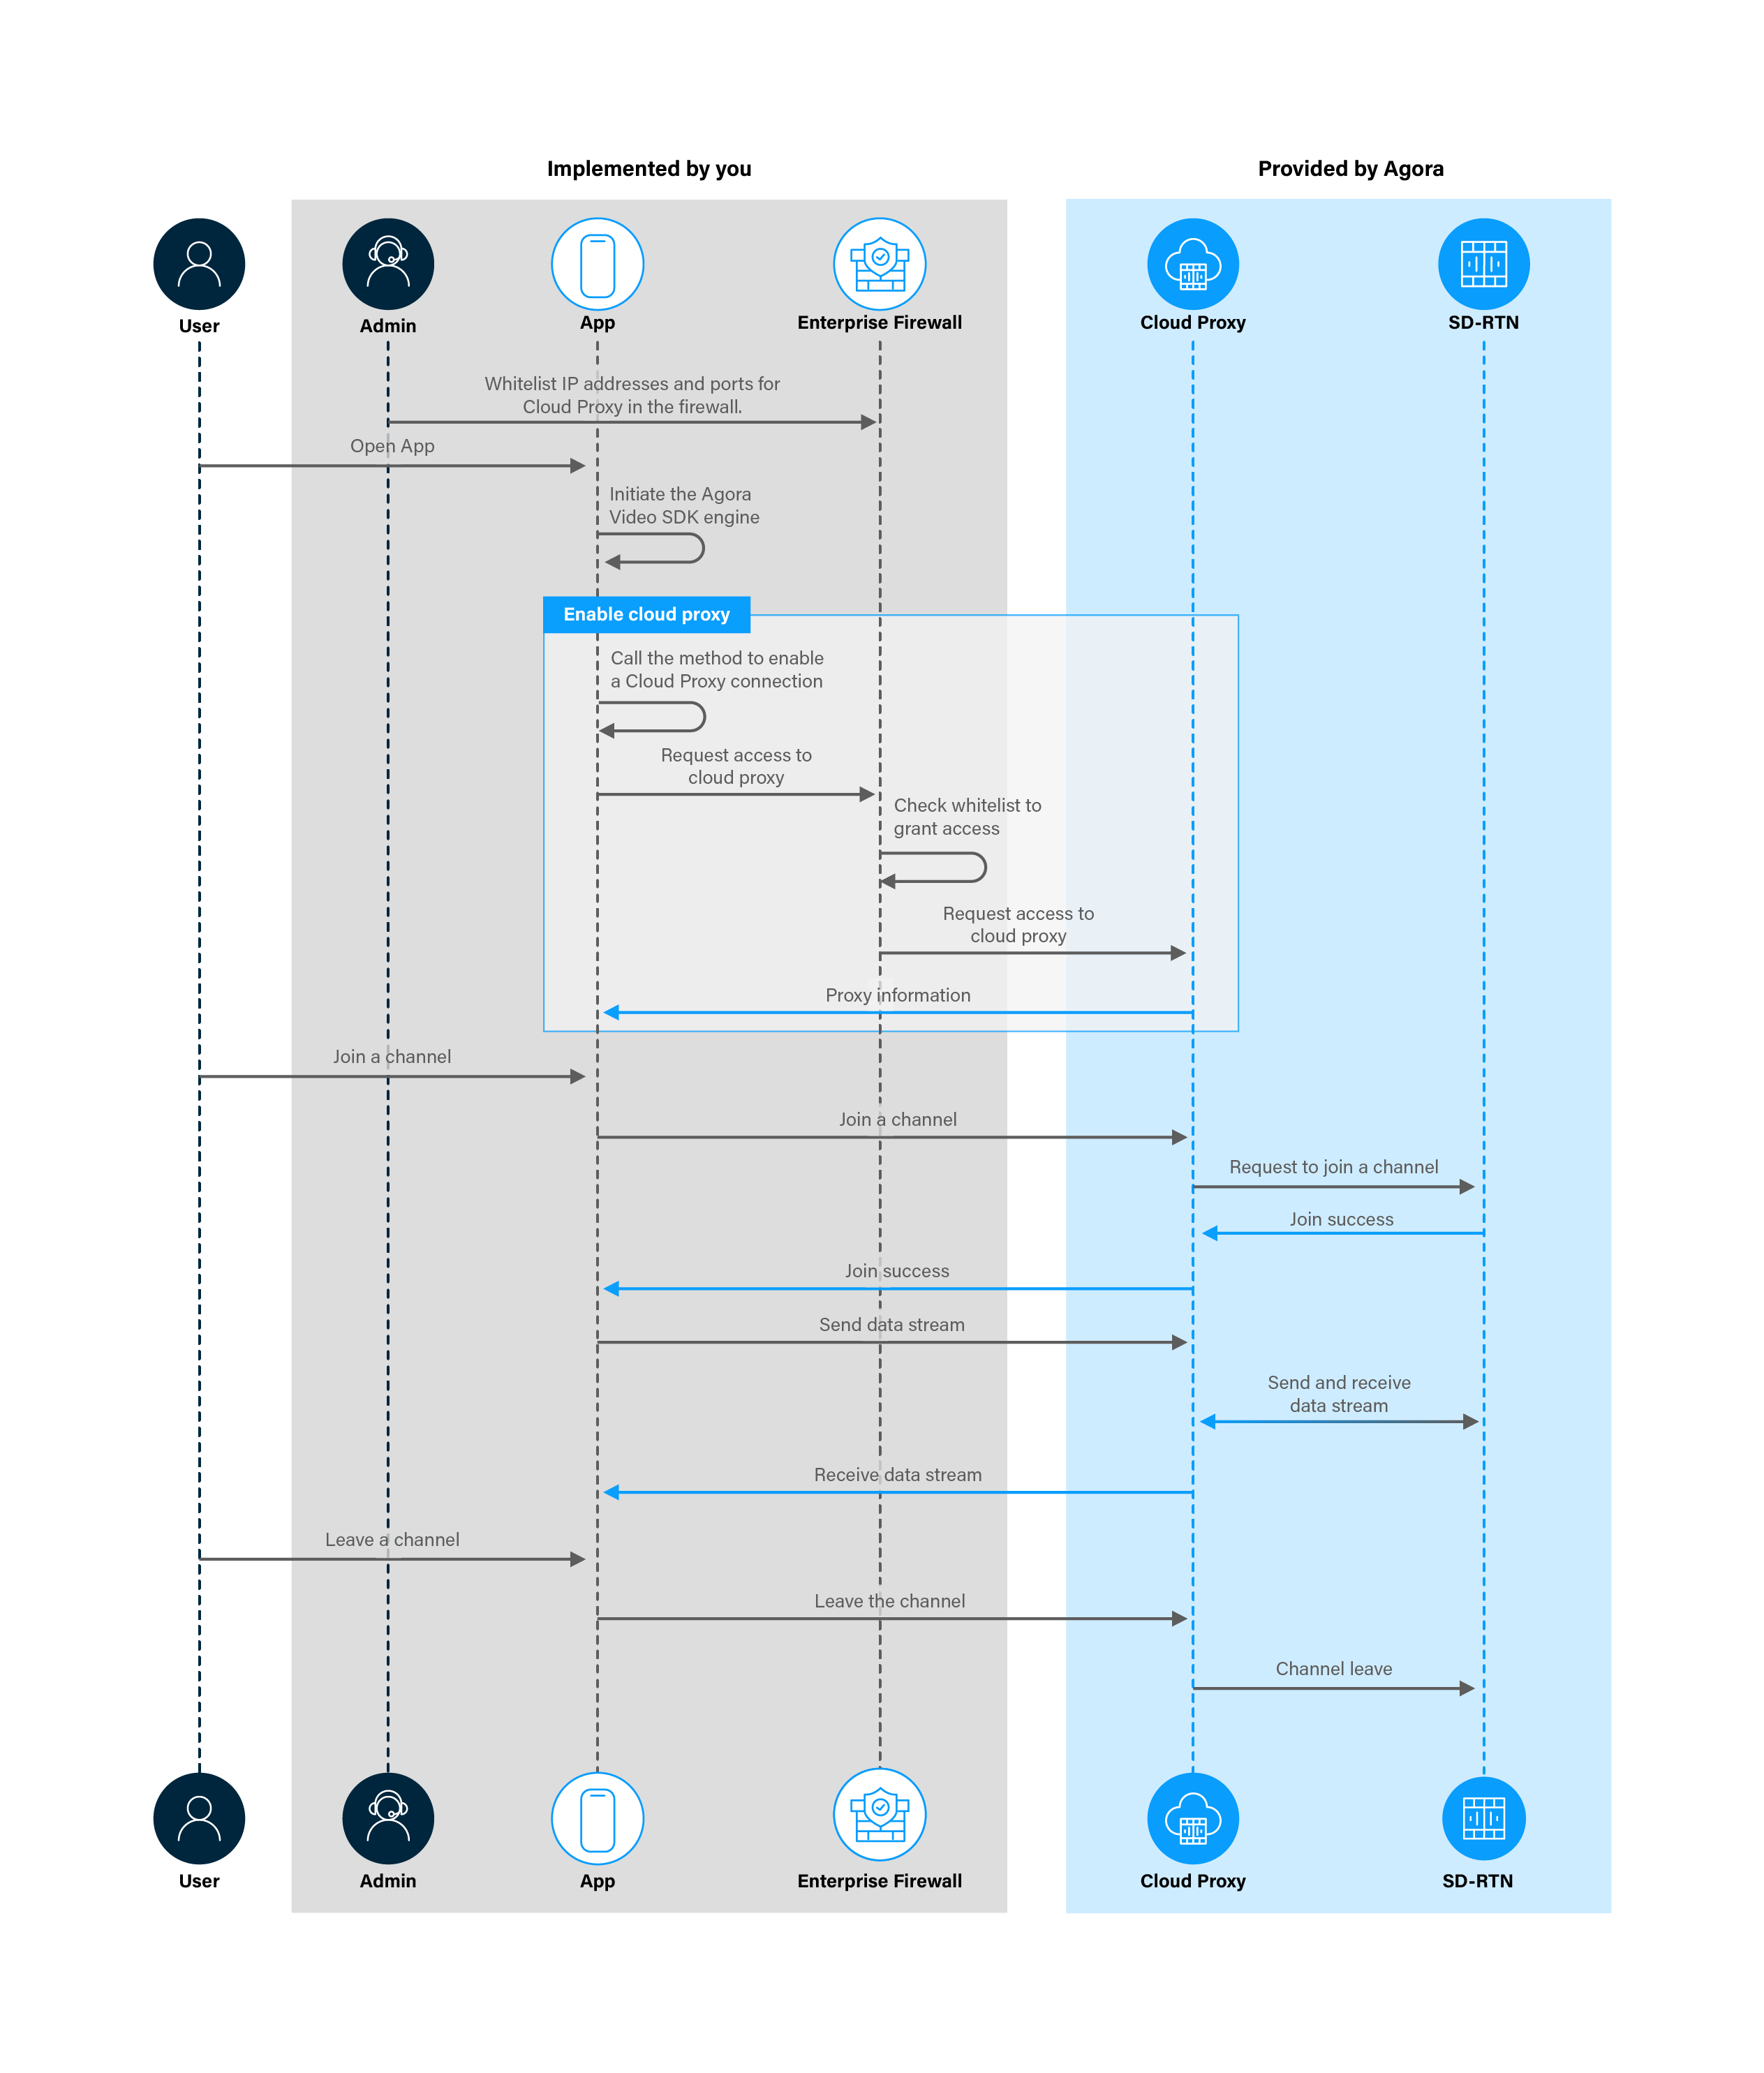
The steps you need to implement in your app are:
-
Before connecting to Agora SD-RTN™, set Video SDK to request a connection to Cloud Proxy.
-
When the request succeeds, Cloud Proxy sends back the proxy information.
-
Video SDK sends signaling and media data to Cloud Proxy, which forwards this data to Agora SD-RTN™.
-
Agora SD-RTN™ sends signaling and media data to Cloud Proxy, which forwards it to Video SDK.
Prerequisites
In order to follow this procedure you must have:
-
Implemented the SDK quickstart project for Interactive Live Streaming.
-
Configured your firewall to allow communication through the Cloud Proxy allowed IP address.
Project setup
In order to create the environment necessary to use Cloud Proxy feature in your app, do the following:
-
Enable and disable Cloud Proxy:
-
If your estimated Peak Concurrent Users (PCU) during a month exceeds 200, and you want to use either Force UDP or Force TCP mode, contact Agora Customer Support to activate Cloud Proxy.
-
If your estimated PCU during a month is 200 or less:
-
In Agora Console, click the Project Management icon on the left.
-
In Project Management, click Config for the project you want to enable Cloud Proxy for.
-
Under Features, find Cloud Proxy (Force UDP and Force TCP modes), then click Enable.
-
Read the Enable Cloud Proxy information carefully. Check the box showing you have read the page, then click Enable.
Your app has access to Cloud Proxy within 24 hours.
-
Check the Status of Cloud Proxy (Force UDP and Force TCP modes). Once you see Enabled, Your app has access to Cloud Proxy.
After activation, you can deactivate Cloud Proxy at any time using Agora Console. Cloud Proxy is deactivated immediately.
-
-
-
Open your app:
In your IDE, open the SDK quickstart Interactive Live Streaming project you created previously.
Implement communication using Cloud Proxy
This section shows how to use the Video SDK to implement Cloud Proxy in your app, step-by-step.
-
Set Video SDK to connect to Cloud Proxy before you join a channel
To access Agora SD-RTN™ in a restricted network environment, call
setCloudProxyand pass0as a parameter to select the automatic mode for transmission. ThesetCloudProxymethod returns0upon successful initiation of cloud proxy service.To enable the Cloud Proxy service in your app, in
/app/java/com.example.<projectname>/MainActivity, add the following code afteragoraEngine = RtcEngine.create(config);:
Test your Cloud Proxy implementation
To ensure that you have implemented Cloud Proxy in your app:
-
Generate a temporary token in Agora Console .
-
In your browser, navigate to the Agora web demo and update App ID, Channel, and Token with the values for your temporary token, then click Join.
-
In Android Studio, open
app/java/com.example.<projectname>/MainActivity, and updateappId,channelNameandtokenwith the values for your temporary token. -
Connect a physical Android device to your development device.
-
In Android Studio, click Run app. A moment later you see the project installed on your device.
If this is the first time you run the project, grant microphone and camera access to your app.
- Click Join to start a call.
You see your app starts the proxy service and magically connects to the Agora SD-RTN™ which was not possible in a restricted network environment.
Reference
This section contains information that completes the information in this page, or points you to documentation that explains other aspects to this product.