Call quality
Customer satisfaction for your Video Calling integrated app depends on the quality of video and audio it provides. Quality of audiovisual communication through your app is affected by the following factors:
-
Bandwidth of network connection: Bandwidth is the volume of information that an Internet connection can handle per unit of time. When the available bandwidth is not sufficient to transmit the amount of data necessary to provide the desired video quality, your users see jerky or frozen video along with audio that cuts in and out.
-
Stability of network connection: Network connections are often unstable with the network quality going up and down. Users get temporarily disconnected and come back online after an interruption. These issues lead to a poor audiovisual experience for your users unless your app is configured to respond to these situations and take remedial actions.
-
Hardware quality: The camera and microphone used to capture video and audio must be of sufficiently good quality. If the user's hardware does not capture the audiovisual information in suitably high definition, it limits the quality of audio and video that is available to the remote user.
-
Video and audio settings: The sharpness, smoothness, and overall quality of the video is directly linked to the frame rate, bitrate and other video settings. Similarly, the audio quality depends on the sample rate, bitrate, number of channels and other audio parameters. If you do not choose proper settings, the audio and video transmitted are of poor quality. On the other hand, if the settings are too demanding, the available bandwidth quickly gets choked, leading to suboptimal experience for your users.
-
Echo: Echo is produced when your audio signal is played by a remote user through a speakerphone or an external device. This audio is captured by the remote user's microphone and sent back to you. Echo negatively affects audio quality, making speech difficult to understand.
-
Multiple users in a channel: When multiple users engage in real-time audio and video communication in a channel, the available bandwidth is quickly used up due to several incoming audio and video streams. The device performance also deteriorates due to the excessive workload required to decode and render multiple video streams.
This page shows you how to use Video SDK features to account for these factors and ensure optimal audio and video quality in your app.
Understand the tech
Video SDK provides the following features to deal with channel quality issues:
-
Network probe test: The network probe test checks the last-mile network quality before you join a channel. The method returns network quality statistics including round-trip latency, packet loss rate, and network bandwidth.
-
Echo test: The echo test captures audio through the microphone on the user’s device, and sends it to Agora SD-RTN™. After a delay of about 2 seconds, Agora SD-RTN™ sends the audio back to the sending device to be played. The returned audio enable a user to judge if their hardware and network connection are of adequate quality. Agora recommends that an echo test be performed before a network probe test.
-
Audio profiles: Delivering the best quality audio to your users requires choosing audio settings customized for your particular application. In Video SDK you can choose from pre-configured audio profiles and audio scenarios to optimize audio settings for a wide range of applications.
- An audio profile sets the audio sample rate, bitrate, encoding scheme, and the number of channels for your audio. Video SDK offers several preset audio profiles to choose from. To pick the most suitable audio profile for your application, refer to the List of audio profiles.
- An audio scenario specifies the audio performance in terms of volume, audio quality, and echo cancellation. Based on the nature of your application, you can pick the most suitable option from the List of audio scenarios.
-
Video profiles: In real-time engagement scenarios, user experience is closely tied to the sharpness, smoothness, and overall quality of the video. In Video SDK you can set the video dimensions, framerate, bitrate, orientation mode, and mirror mode by specifying a video profile. You can also set the degradation preference to specify how video quality is degraded under suboptimal network conditions. To find the suitable bitrate for a given combination of dimensions and framerate, refer to the Video profile table.
-
In-call quality statistics: Video SDK provides several callbacks and methods to monitor channel quality in real-time. These methods and callbacks provide vital statistics to evaluate communication quality and provide the information necessary to take remedial actions. Video SDK provides you the following statistics :
-
Network quality: The uplink and downlink network quality in terms of the transmission bitrate, packet loss rate, average Round-Trip Time (RTT), and jitter in your network.
-
Call quality: Information on the current user session and the resources being used by the channel in terms of the number of users in a channel, packet loss rate, CPU usage and call duration. Use these statistics to troubleshoot call quality issues.
-
Local audio quality: Local audio measurements such as audio channels, sample rate, sending bitrate, and packet loss rate in the audio stream.
-
Remote audio quality: These statistics provide information such as the number of channels, received bitrate, jitter in the audio stream, audio loss rate, and packet loss rate.
-
Local video quality: Local video quality statistics such as packet loss rate, frame rate, encoded frame width, and sent bitrate.
-
Remote video quality: These statistics include information about the width and height of video frames, packet loss rate, receiving stream type, and bitrate in the reported interval.
-
Video and Audio states: Agora SD-RTN™ reports the new state, and the reason for state change, whenever the state of an audio or video stream changes.
-
-
Dual stream mode: In dual-stream mode, Video SDK transmits a high-quality and a low-quality video stream from the sender. The high-quality stream has higher resolution and bitrate than the the low-quality video stream. Remote users subscribe to the low-quality stream to improve communication continuity as it reduces bandwidth consumption. Subscribers should also choose the low-quality video streams when network condition are unreliable, or when multiple users publish streams in a channel.
-
Video stream fallback: When network conditions deteriorate, Video SDK automatically switches the video stream from high-quality to low-quality, or disables video to ensure audio delivery. Agora SD-RTN™ continues to monitor the network quality after fallback, and restores the video stream when network conditions allow it. To improve communication quality under extremely poor network conditions, implement a fallback option in your app.
-
Video for multiple users: When multiple users join a channel, several incoming high-quality video streams negatively impact network and device performance. In such cases, you can manage the excess load by playing high-quality video from the user who has focus, and low quality streams from all other users. To implement this feature, it is necessary for all users in the channel to enable the dual stream mode.
-
Echo cancellation when playing audio files: Video SDK offers audio mixing functionality to play media in a channel. You can mix a local or online audio file with the audio captured through the microphone, or completely replace the microphone audio. Audio mixing takes advantage of the echo cancellation features of Video SDK to reduce echo in a channel. Refer to Audio and voice effects to learn more about audio mixing in Video SDK.
-
Connection state monitoring: The connection state between an app and Agora SD-RTN™ changes when the app joins or leaves a channel, or goes offline due to network or authentication issues. Video SDK provides connection state monitoring to detect when and why a network connection is interrupted. When the connection state changes, Agora SD-RTN™ sends a callback to notify the app. Video SDK then automatically tries to reconnect to the server to restore the connection.
- Log files: Video SDK provides configuration options that you use to customize the location, content and size of log files containing key data of Video SDK operation. When you set up logging, Video SDK writes information messages, warnings, and errors regarding activities such as initialization, configuration, connection and disconnection to log files. Log files are useful in detecting and resolving channel quality issues.
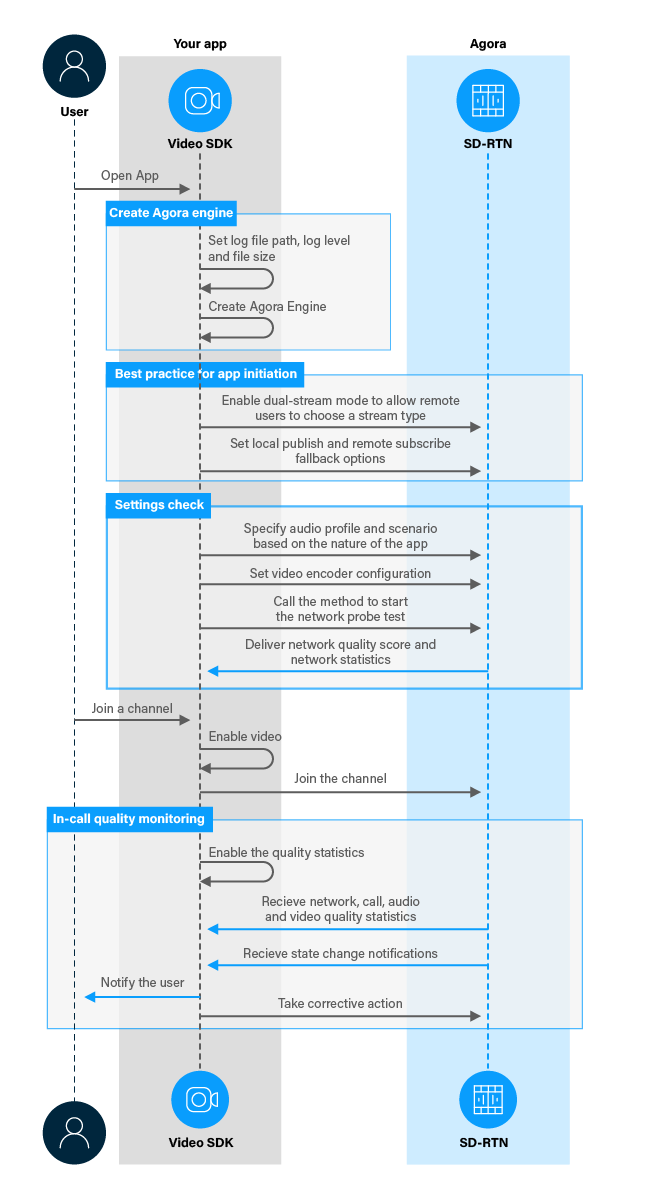
The following figure shows the workflow you need to implement to ensure channel quality in your app:
Prerequisites
In order to follow this procedure you must have:
- Implemented the SDK quickstart project for Video Calling.
- Android Studio 4.1 or higher.
- Android SDK API Level 24 or higher.
- A mobile device that runs Android 4.1 or higher.
-
A computer with Internet access.
Ensure that no firewall is blocking your network communication.
Project setup
To create the environment necessary to implement call quality best practices into your app, open the SDK quickstart Video Calling project you created previously.
Implement best practice to optimize call quality
This section shows you how to integrate call quality optimization features of Video SDK into your app, step by step.
Implement the user interface
This section guides you through the necessary UI changes in the SDK quickstart project interface to implement call quality features.
Add a network status indicator to the user interface
To enable app users to see the network status, add TextViews to the user interface. To do this, open /app/res/layout/activity_main.xml and add the following lines before </RelativeLayout>:
Handle the system logic
-
Import the required Android and Agora libraries
To access and use the
TextViewobject and integrate Video SDK channel quality libraries, add the following statements after the lastimportstatement in/app/java/com.example.<projectname>/MainActivity. -
Define variables to manage test state and workflow
In
/app/java/com.example.<projectname>/MainActivity, add the following declaration to classMainActivity: -
Update the network status indication
To show the network quality result visually to the user, add the following to the
MainActivityclass:To set up access to the elements, add the following lines to the
onCreatemethod aftersetupVideoSDKEngine();
Implement features to ensure quality
To implement the call quality features, take the following steps:
-
Enable the user to test the network
In the
MainActivityclass, add the following method: -
Implement best practice for app initiation
When a user starts your app, the Agora Engine is initialized in
setupVideoSDKEngine. After initialization, do the following:- Enable dual stream mode: Required for multi-user scenarios.
- Set an audio profile and audio scenario: Setting an audio profile is optional and only required if you have special requirements such as streaming music.
- Set the video profile: Setting a video profile is also optional. It is useful when you want to change one or more of
mirrorMode,frameRate,bitrate,dimensions,orientationMode,degradationPreferorcompressionPreferfrom default setting to custom values. If you don't set the video profile, the default profile is used. See video profile table. - Start the network probe test: A quick test at startup to gauge network quality.
To implement these features, add the following code to
setupVideoSDKEngineafteragoraEngine.enableVideo(); -
Test the user's hardware
The echo test checks that the user's hardware is working properly. To start and stop the test, add the following method to the
MainActivityclass: -
Listen to Agora Engine events to receive state change notifications and quality statistics
Add the following event handlers to receive state change notifications and quality statistics:
onLastmileQuality: Receives the network quality result.onLastmileProbeResult: Receives detailed probe test results.onNetworkQuality: Receives statistics on network quality.onRtcStats: Receives the Agora Engine stats.onRemoteVideoStateChanged: Receives notification regarding any change in the state of the remote video.onRemoteVideoStats: Receives stats about the remote videos.
In the
MainActivityclass, add the following methods afterprivate final IRtcEngineEventHandler mRtcEventHandler = new IRtcEngineEventHandler() {:Each event reports the statistics of the audio video streams from each remote user and host.
-
Switch stream quality when the user taps the remote video
To take advantage of dual-stream mode and switch remote video quality to high or low, add the following to the
MainActivityclass:To fire this method when the user taps the remote view panel, add the following line after
<FrameLayout android:id="@+id/remote_video_view_container"inactivity_main.xml:To obtain the uid of the remote user, add the following line to the
onUserJoinedmethod: -
Configure the Video SDK log file
To customize the location, content and size of log files, add the following code to
setupVideoSDKEnginebeforeagoraEngine = RtcEngine.create(config);:Make sure you replace the
<package name>infilePathwith the name of your package.If you want to upload the log file automatically to a CDN, call
setLocalAccessPoint(LocalAccessPointConfiguration config)to specify the local access point and assign the native access module to the SDK.
Test your implementation
To ensure that you have implemented call quality features into your app:
-
Generate a temporary token in Agora Console .
-
In your browser, navigate to the Agora dual stream web demo and update App ID, Channel, and Token with the values for your temporary token, then click Join.
-
In Android Studio, open
app/java/com.example.<projectname>/MainActivity, and updateappId,channelNameandtokenwith the values for your temporary token. -
Connect a physical Android device to your development device.
-
In Android Studio, click Run app. A moment later you see the project installed on your device.
If this is the first time you run the project, grant microphone and camera access to your app.
-
When the app starts, it does the following:
- Sets the log file location, size, and logging level according to your preference.
- Enables the dual-stream mode.
- Sets the audio profile.
- Sets the video profile.
- Starts a network probe test.
You see the result of the network probe test displayed in the network status icon.
-
Run the echo test.
-
Press Start Echo Test. You see the local camera feed on the test device screen.
-
Speak into the device microphone. You hear the recorded audio after a short delay.
This test confirms that the user's hardware is working properly.
-
Press Stop Echo Test to end the test before joining a channel.
-
- Press Join to connect to the same channel as your web demo.
-
After joining a channel, you receive toast messages informing you of some selected call statistics, including:
- The number of users in the channel
- Packet loss rate
- Remote video stats
- Remote video state changes
-
You see the network status indicator updated periodically based on the result of the
onNetworkQualitycallback. -
Tap the remote video panel. You see the remote video switches from high-quality to low-quality. Tap the remote video again to switch back to hight-quality video.
Reference
This section contains information that completes the information in this page, or points you to documentation that explains other aspects to this product.
Recommended Video Settings
The recommended video settings vary by scenario. For example, in a one-to-one online class, the video windows of the teacher and student are both large, which calls for higher resolutions, frame rate, and bitrate. However, in a one-to-many online class, the video windows are smaller. You can set lower resolution, frame rate, and bitrate to accommodate bandwidth limitations. The recommended settings for these different scenarios are:
-
One-to-one video call:
- Resolution: 320 x 240; Frame rate: 15 fps; Bitrate: 200 Kbps.
- Resolution: 640 x 360; Frame rate: 15 fps; Bitrate: 400 Kbps.
-
One-to-many video call:
- Resolution: 160 x 120; Frame rate: 15 fps; Bitrate: 65 Kbps.
- Resolution: 320 x 180; Frame rate: 15 fps; Bitrate: 140 Kbps.
- Resolution: 320 x 240; Frame rate: 15 fps; Bitrate: 200 Kbps.
Video profile table
Video SDK provides a selection of video dimensions, framerate, and bitrate to choose from. You can also customize the values according to the table below.
| Video Profile | Resolution (Width×Height) | Frame rate (fps) | Bitrate(Kbps) |
|---|---|---|---|
| 120p | 160 × 120 | 15 | 65 |
| 120p_1 | 160 × 120 | 15 | 65 |
| 120p_3 | 120 × 120 | 15 | 50 |
| 180p | 320 × 180 | 15 | 140 |
| 180p_1 | 320 × 180 | 15 | 140 |
| 180p_3 | 180 × 180 | 15 | 100 |
| 180p_4 | 240 × 180 | 15 | 120 |
| 240p | 320 × 240 | 15 | 200 |
| 240p_1 | 320 × 240 | 15 | 200 |
| 240p_3 | 240 × 240 | 15 | 140 |
| 240p_4 | 424 × 240 | 15 | 220 |
| 360p | 640 × 360 | 15 | 400 |
| 360p_1 | 640 × 360 | 15 | 400 |
| 360p_3 | 360 × 360 | 15 | 260 |
| 360p_4 | 640 × 360 | 30 | 600 |
| 360p_6 | 360 × 360 | 30 | 400 |
| 360p_7 | 480 × 360 | 15 | 320 |
| 360p_8 | 480 × 360 | 30 | 490 |
| 360p_9 | 640 × 360 | 15 | 800 |
| 360p_10 | 640 × 360 | 24 | 800 |
| 360p_11 | 640 × 360 | 24 | 1000 |
| 480p | 640 × 480 | 15 | 500 |
| 480p_1 | 640 × 480 | 15 | 500 |
| 480p_2 | 640 × 480 | 30 | 1000 |
| 480p_3 | 480 × 480 | 15 | 400 |
| 480p_4 | 640 × 480 | 30 | 750 |
| 480p_6 | 480 × 480 | 30 | 600 |
| 480p_8 | 848 × 480 | 15 | 610 |
| 480p_9 | 848 × 480 | 30 | 930 |
| 480p_10 | 640 × 480 | 10 | 400 |
| 540p (Default) | 960 × 540 | 15 | 1100 |
| 720p | 1280 × 720 | 15 | 1130 |
| 720p_1 | 1280 × 720 | 15 | 1130 |
| 720p_2 | 1280 × 720 | 30 | 2000 |
| 720p_3 | 1280 × 720 | 30 | 1710 |
| 720p_5 | 960 × 720 | 15 | 910 |
| 720p_6 | 960 × 720 | 30 | 1380 |
| 1080p | 1920 × 1080 | 15 | 2080 |
| 1080p_1 | 1920 × 1080 | 15 | 2080 |
| 1080p_2 | 1920 × 1080 | 30 | 3000 |
| 1080p_3 | 1920 × 1080 | 30 | 3150 |
| 1080p_5 | 1920 × 1080 | 60 | 4780 |
For more details, see VideoEncoderConfiguration.
Mainstream video profiles
You can also refer to the following tables to learn the default resolution, frame rate, and bitrate of the low-quality video stream for different mainstream video profiles of the high-quality video stream.
| High-quality stream video profile: Communication | Default low-quality stream video profile: Communication |
|---|---|
| 320 × 240, 15, 200 | 144 × 108, 5, 20 |
| 640 × 360, 15, 400 | 288 × 162, 5, 40 |
| 640 × 480, 15, 500 | 288 × 216, 5, 50 |
| 1280 × 720, 15, 1130 | 288 × 162, 5, 113 |
| 240 × 320, 15, 200 | 108 × 144, 5, 20 |
| 240 × 320, 15, 200 | 108 × 144, 5, 20 |
| 360 × 640, 15, 400 | 164 × 288, 5, 40 |
| 480 × 640, 15, 500 | 216 × 288, 5, 50 |
| 720 × 1280, 15, 1130 | 164 × 288, 5, 113 |
| High-quality stream video profile: Live-broadcast | Default low-quality stream video profile: Live-broadcast |
|---|---|
| 320 × 240, 15, 350 | 160 × 120, 5, 45 |
| 640 × 360, 15, 650 | 192 × 108, 5, 50 |
| 640 × 480, 15, 800 | 160 × 120, 5, 45 |
| 1280 × 720, 15, 1600 | 192 × 108, 5, 50 |
| 240 × 320, 15, 350 | 120 × 160, 5, 45 |
| 360 × 640, 15, 650 | 108 × 192, 5, 50 |
| 480 × 640, 15, 800 | 120 × 160, 5, 45 |
| 720 × 1280, 15, 1600 | 108 × 192, 5, 50 |
Recommended video profiles
This section provides the recommended video resolution, frame rate, and bitrate for high-quality and low-quality streams.
| Channel profile | Video stream type | Device system | Recommended video profile |
|---|---|---|---|
| Communication | high-quality stream | macOS, Windows | 640 × 480, 15, 500 |
| Android, iOS | 640 × 360, 15, 400 | ||
| low-quality stream | macOS, Windows | 320 × 180, 7, 75 | |
| Android, iOS | 160 × 90, 7, 45 | ||
| Live-broadcast | high-quality stream | macOS, Windows | 640 × 480, 15, 800 |
| Android, iOS | 640 × 360, 15, 650 | ||
| low-quality stream | macOS, Windows | 320 × 180, 7, 126 | |
| Android, iOS | 160 × 90, 7, 64 |
In practice, different user devices, user network conditions, application service locations, and user requirements affect which kinds of video profiles you use. Therefore, if the recommended video profiles are not suitable for you, contact technical support for assistance.
Mirror mode
By default, Video SDK does not mirror the video during encoding. You can use the mirrorMode parameter to decide whether to mirror the video that remote users see.
Connection states
When the connection state changes, Agora sends the onConnectionStateChanged callback. The following diagram illustrates the various states and how the states change as a client app joins and leaves a channel:
When the network connection is interrupted, the SDK automatically tries to reconnect to the server. The following diagram shows the callbacks received by the local user (UID1) and the remote user (UID2) when the local user joins the channel, gets a network exception, lises connection, and rejoins the channal.
As shown in the above diagram:
- T0: The SDK receives the
joinChannelrequest from UID1. - T1: 200 ms after calling
joinChannel, UID1 joins the channel. In the process, UID1 also receives theonConnectionStateChanged(CONNECTING, CONNECTING)callback. When successfully joining the channel, UID 1 receives theonConnectionStateChanged(CONNECTED, JOIN_SUCCESS)andonJoinChannelSuccesscallbacks. - T2: 100 ms after UID1 joins the channel, UID2 receives the
onUserJoinedcallback. - T3: The uplink network condition of UID1 deteriorates. The SDK automatically tries rejoining the channel.
- T4: If UID1 fails to receive any data from the server in four seconds, UID1 receives
onConnectionStateChanged(RECONNCTING, INTERRUPTED); meanwhile the SDK continues to try rejoining the channel. - T5: If UID1 fails to receive any data from the server in ten seconds, UID1 receives
onConnectionLost; meanwhile the SDK continues to try rejoining the channel. - T6: If UID2 fails to receive any data from UID1 in 20 seconds, the SDK decides that UID1 is offline. UID2 receives
onUserOffline. - T7: If UID1 fails to rejoin the channel in 20 minutes, the SDK stops trying to rejoin the channel. UID1 receives
onConnectionStateChanged(FAILED, JOIN_FAILED).
For more detailed information, about the connection state and reasons, see IRtcEngineEventHandler.onConnectionStateChanged.
List of audio profiles
Video SDK provides the following audio profile options:
List of audio scenarios
Video SDK provides the following audio scenarios to choose from:
| Audio Scenario | Purpose |
|---|---|
| Default | Basic communication. |
| Chatroom Entertainment | Entertainment scenario where users need to frequently switch the user role. |
| Education | Education scenario where users want smoothness and stability. |
| Game Streaming | High-quality audio chatroom scenario where hosts mainly play music. |
| Showroom | Showroom scenario where a single host wants high-quality audio. |
| Chatroom Gaming | Gaming scenario for group chat that only contains human voice. |
| IoT | Internet of Things scenario for devices that require low power consumption. |
| Meeting | Meeting scenario that mainly contains human voice. |
Profile and scenario parameter settings for some typical applications
| Application | Profile | Scenario | Features |
|---|---|---|---|
| One-to-one classroom | Default | Default | Prioritizes the call quality with smooth transmission and high-fidelity audio. |
| Battle Royale Game | Speech Standard | Chatroom Gaming | Noise reduction. Transmits voice only. Reduces the transmission rate. Suitable for multiplayer games. |
| Murder Mystery Game | Music Standard | Chatroom Entertainment | High-fidelity audio encoding and decoding. No volume or audio quality change when you mute/unmute the microphone. |
| KTV | Music High-quality | Game Streaming | High-fidelity audio and effects. Adapts to the high-fidelity audio application. |
| Podcast | Music High-quality Stereo | ShowRoom | High-fidelity audio and stereo panning. Support for professional audio hardware. |
| Music education | Music Standard Stereo | Game Streaming | Prioritizes audio quality. Suitable for transmitting live external audio effects. |
| Collaborative teaching | Music Standard Stereo | Chatroom Entertainment | High-fidelity audio and effects. No volume or audio quality change when you mute/unmute the microphone. |
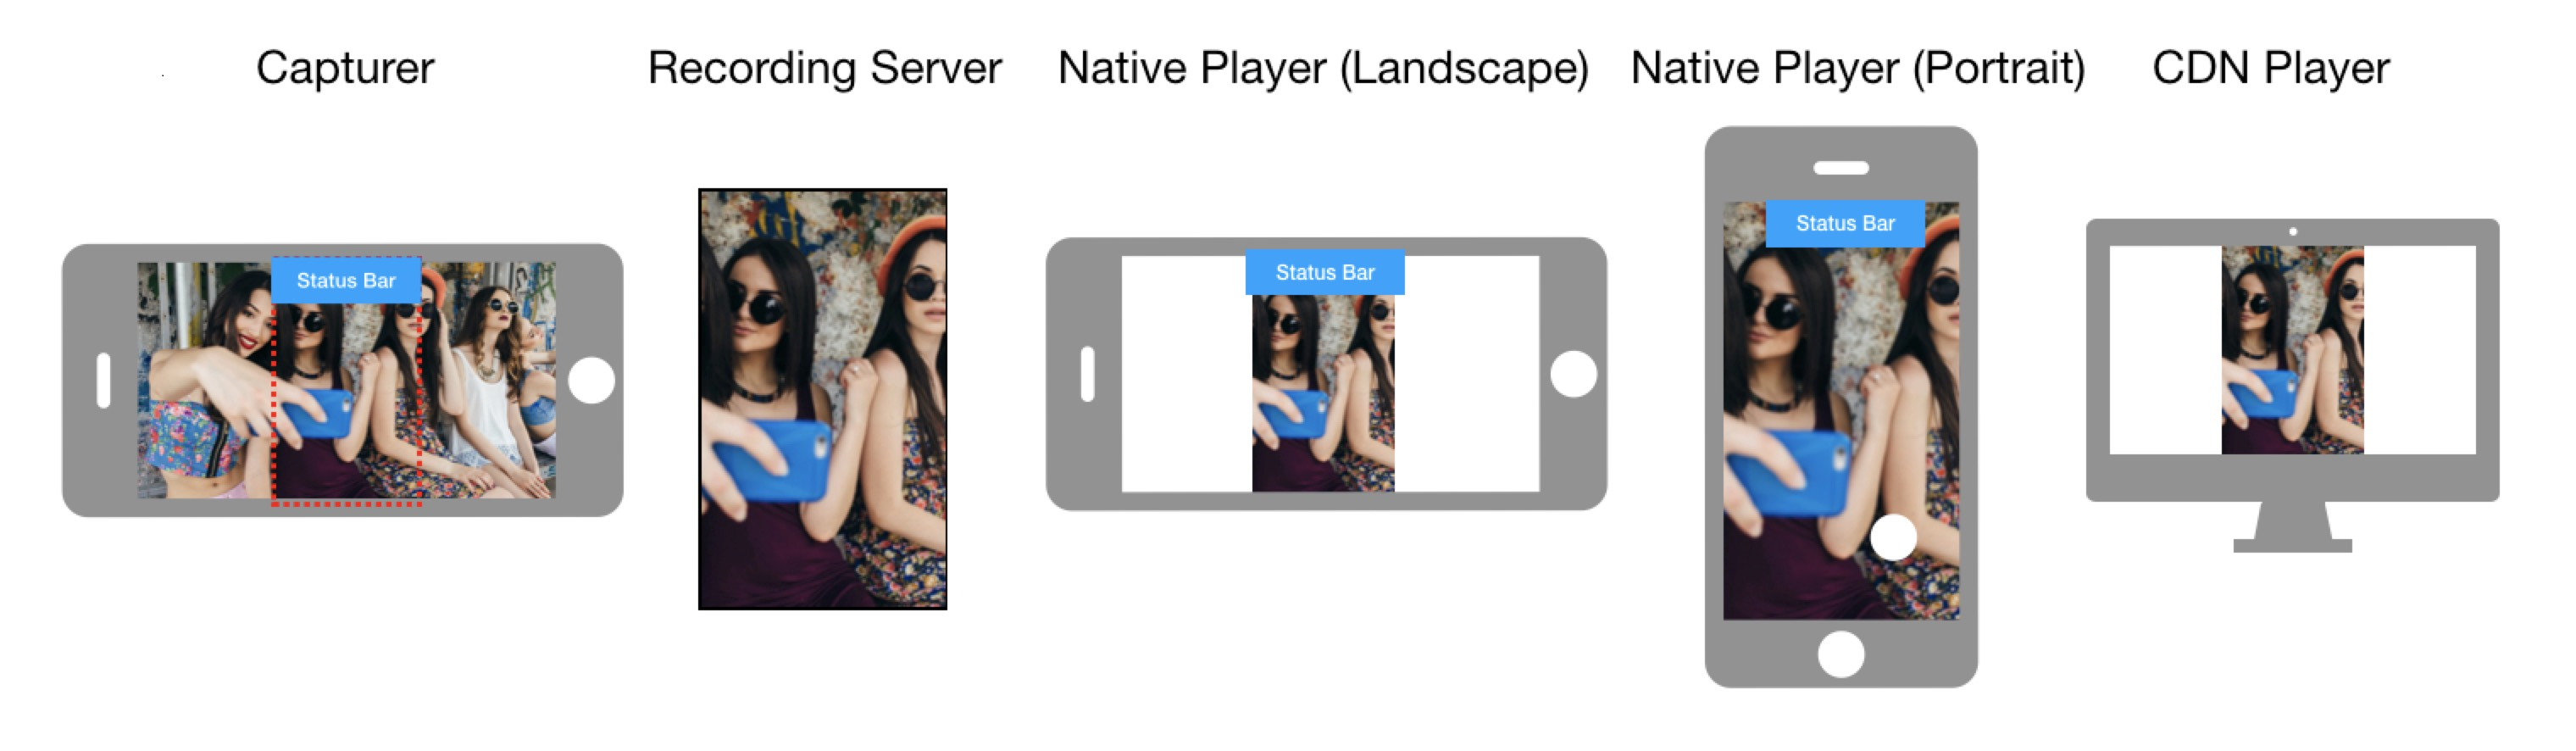
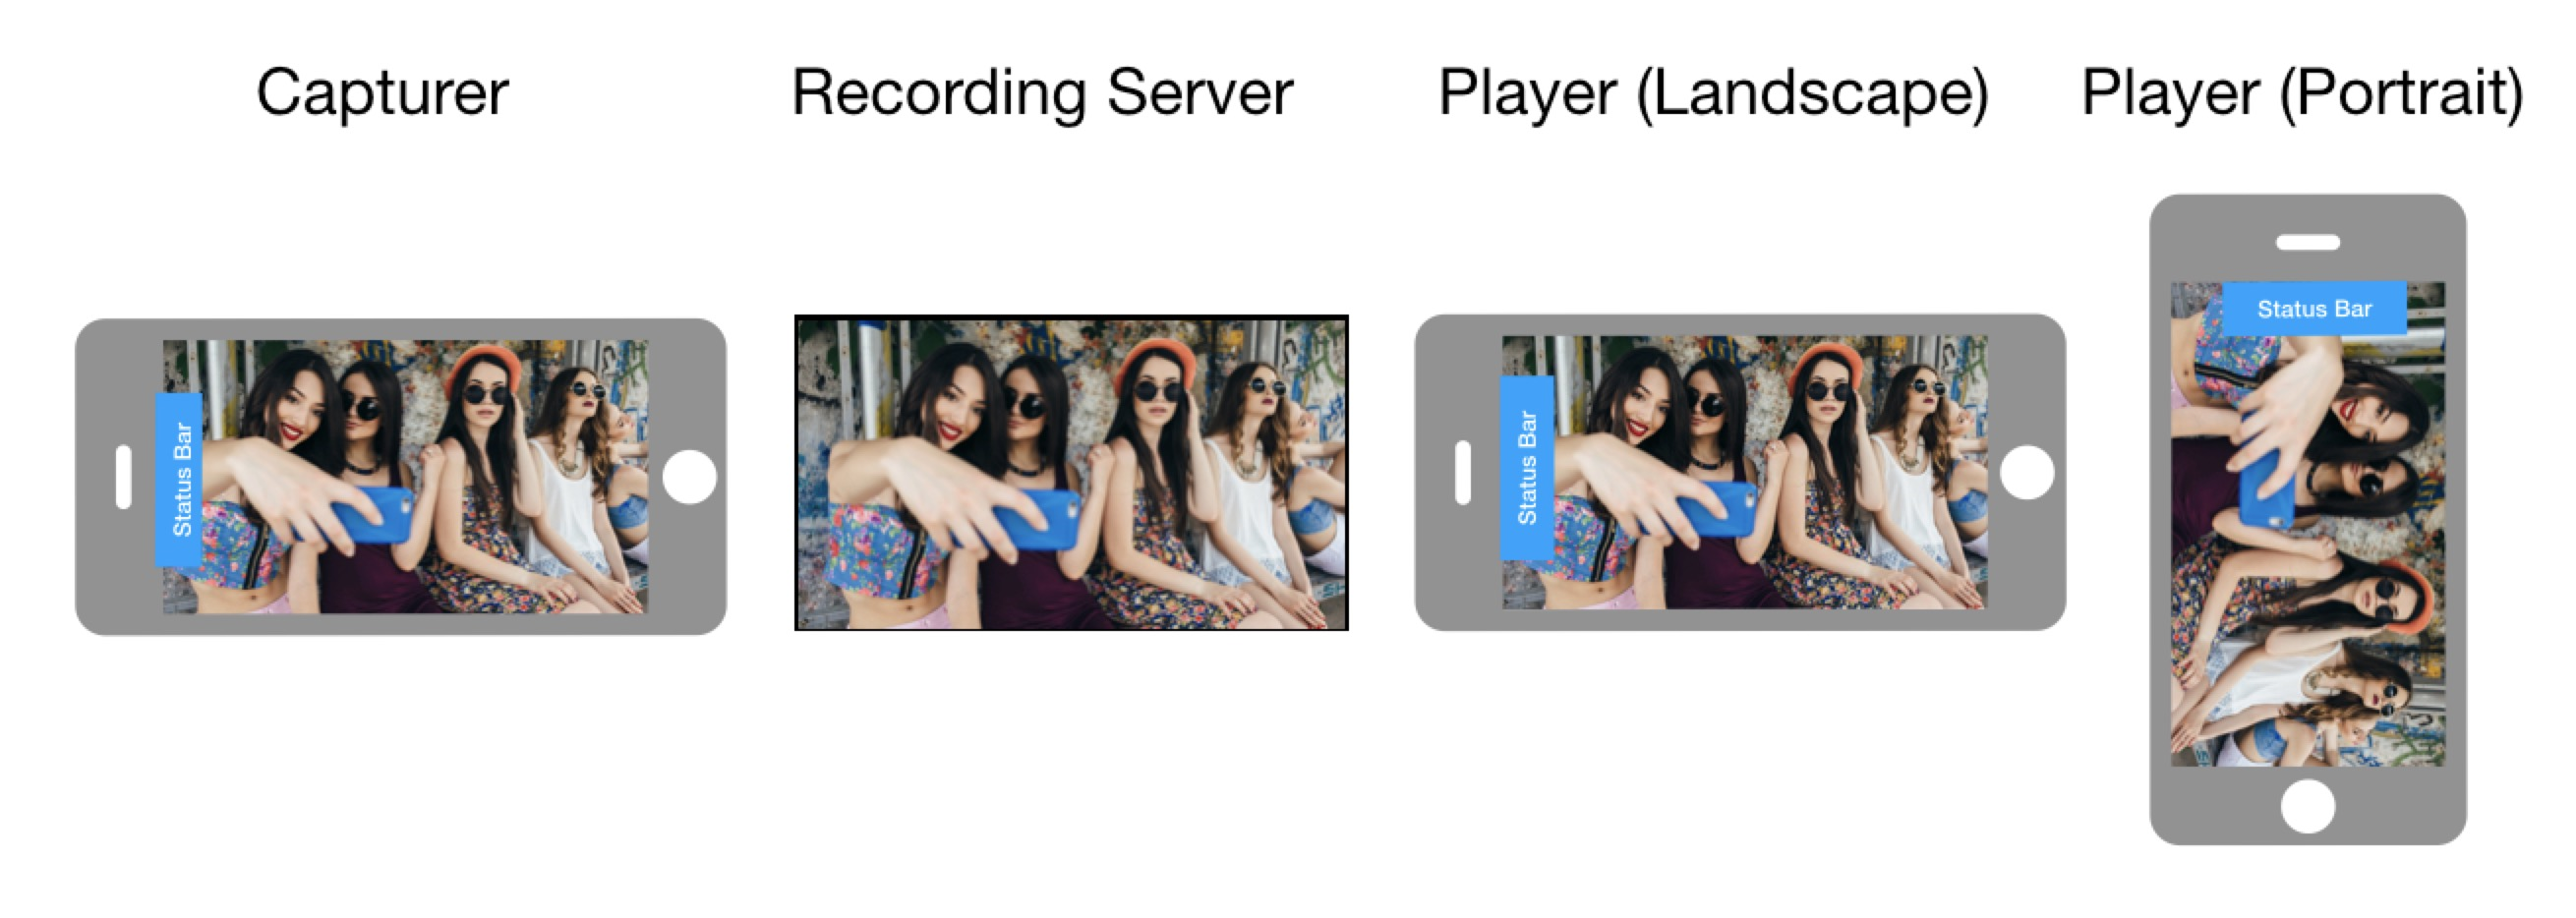
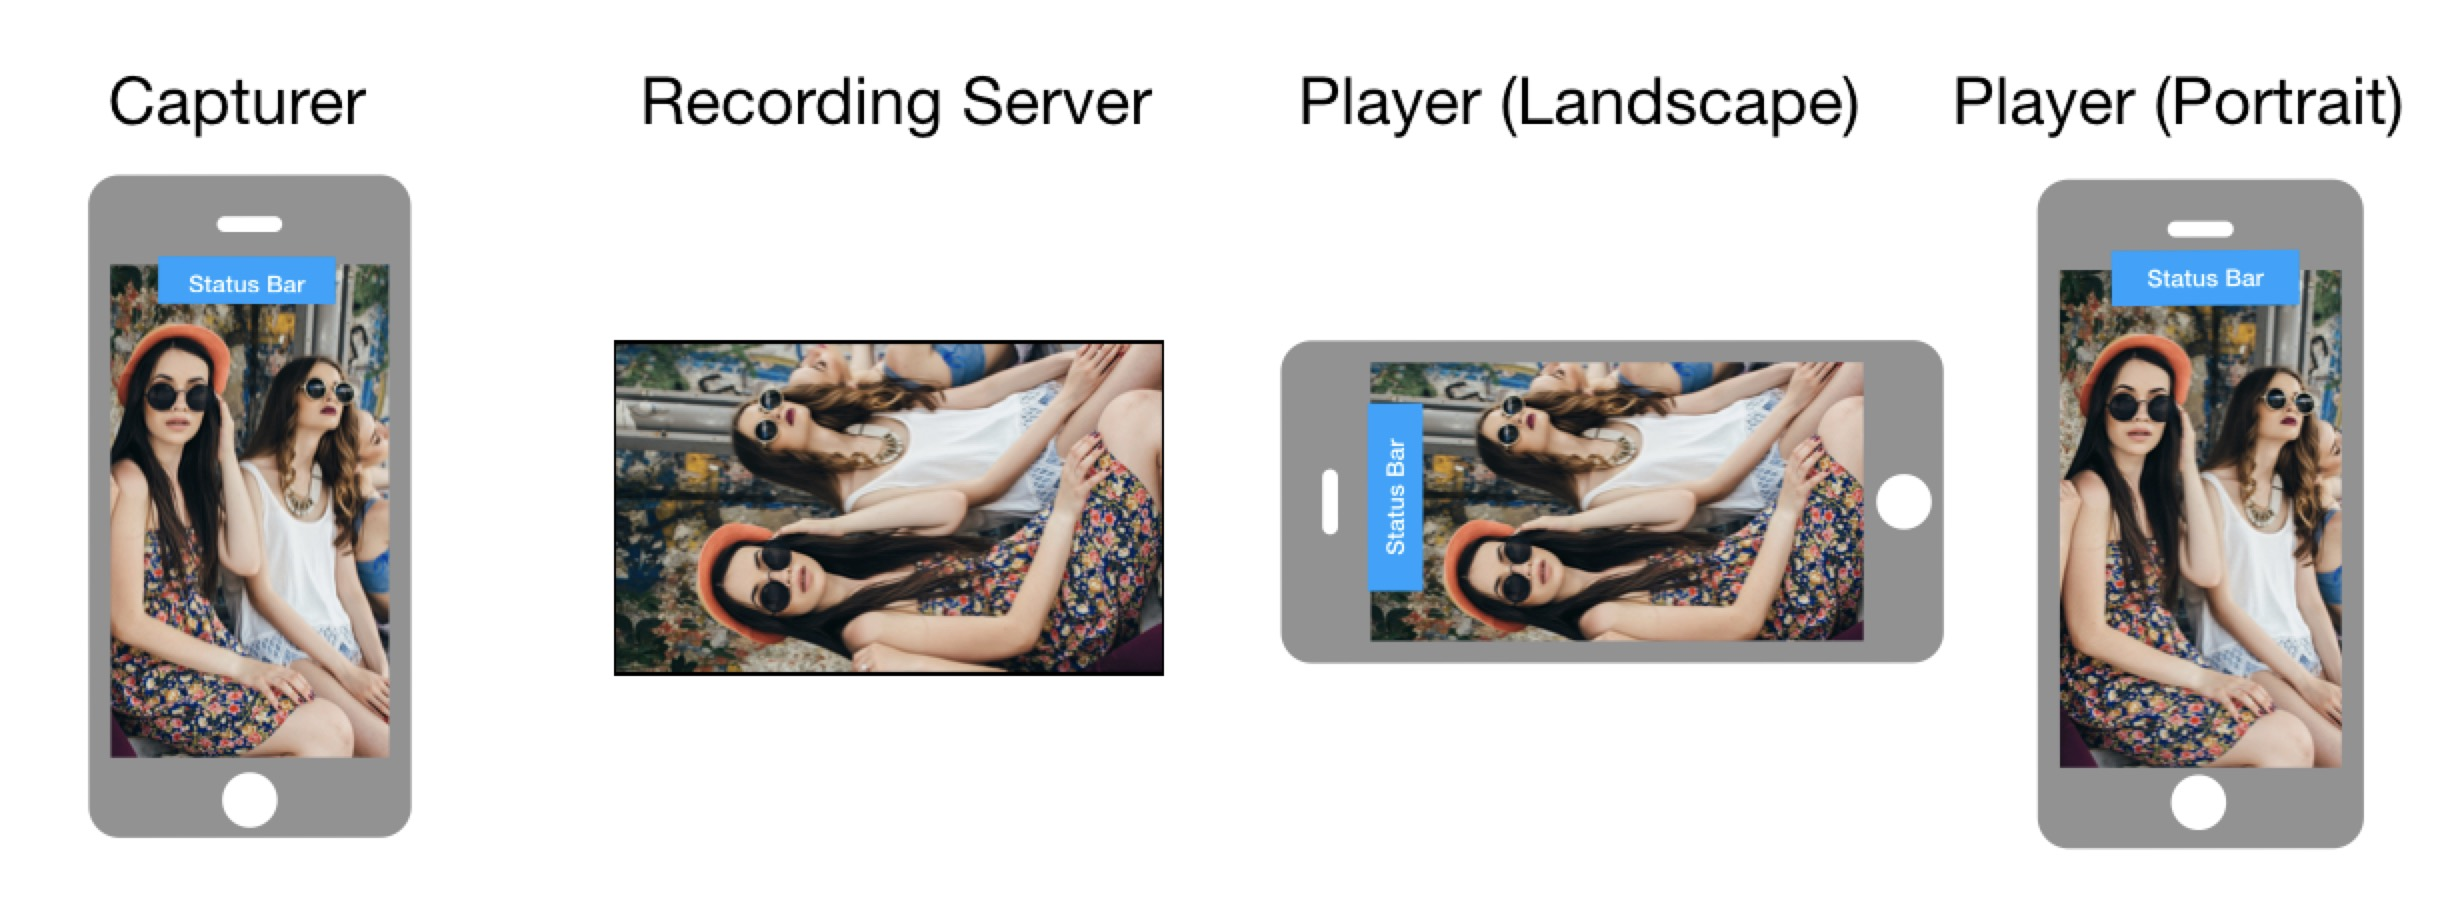
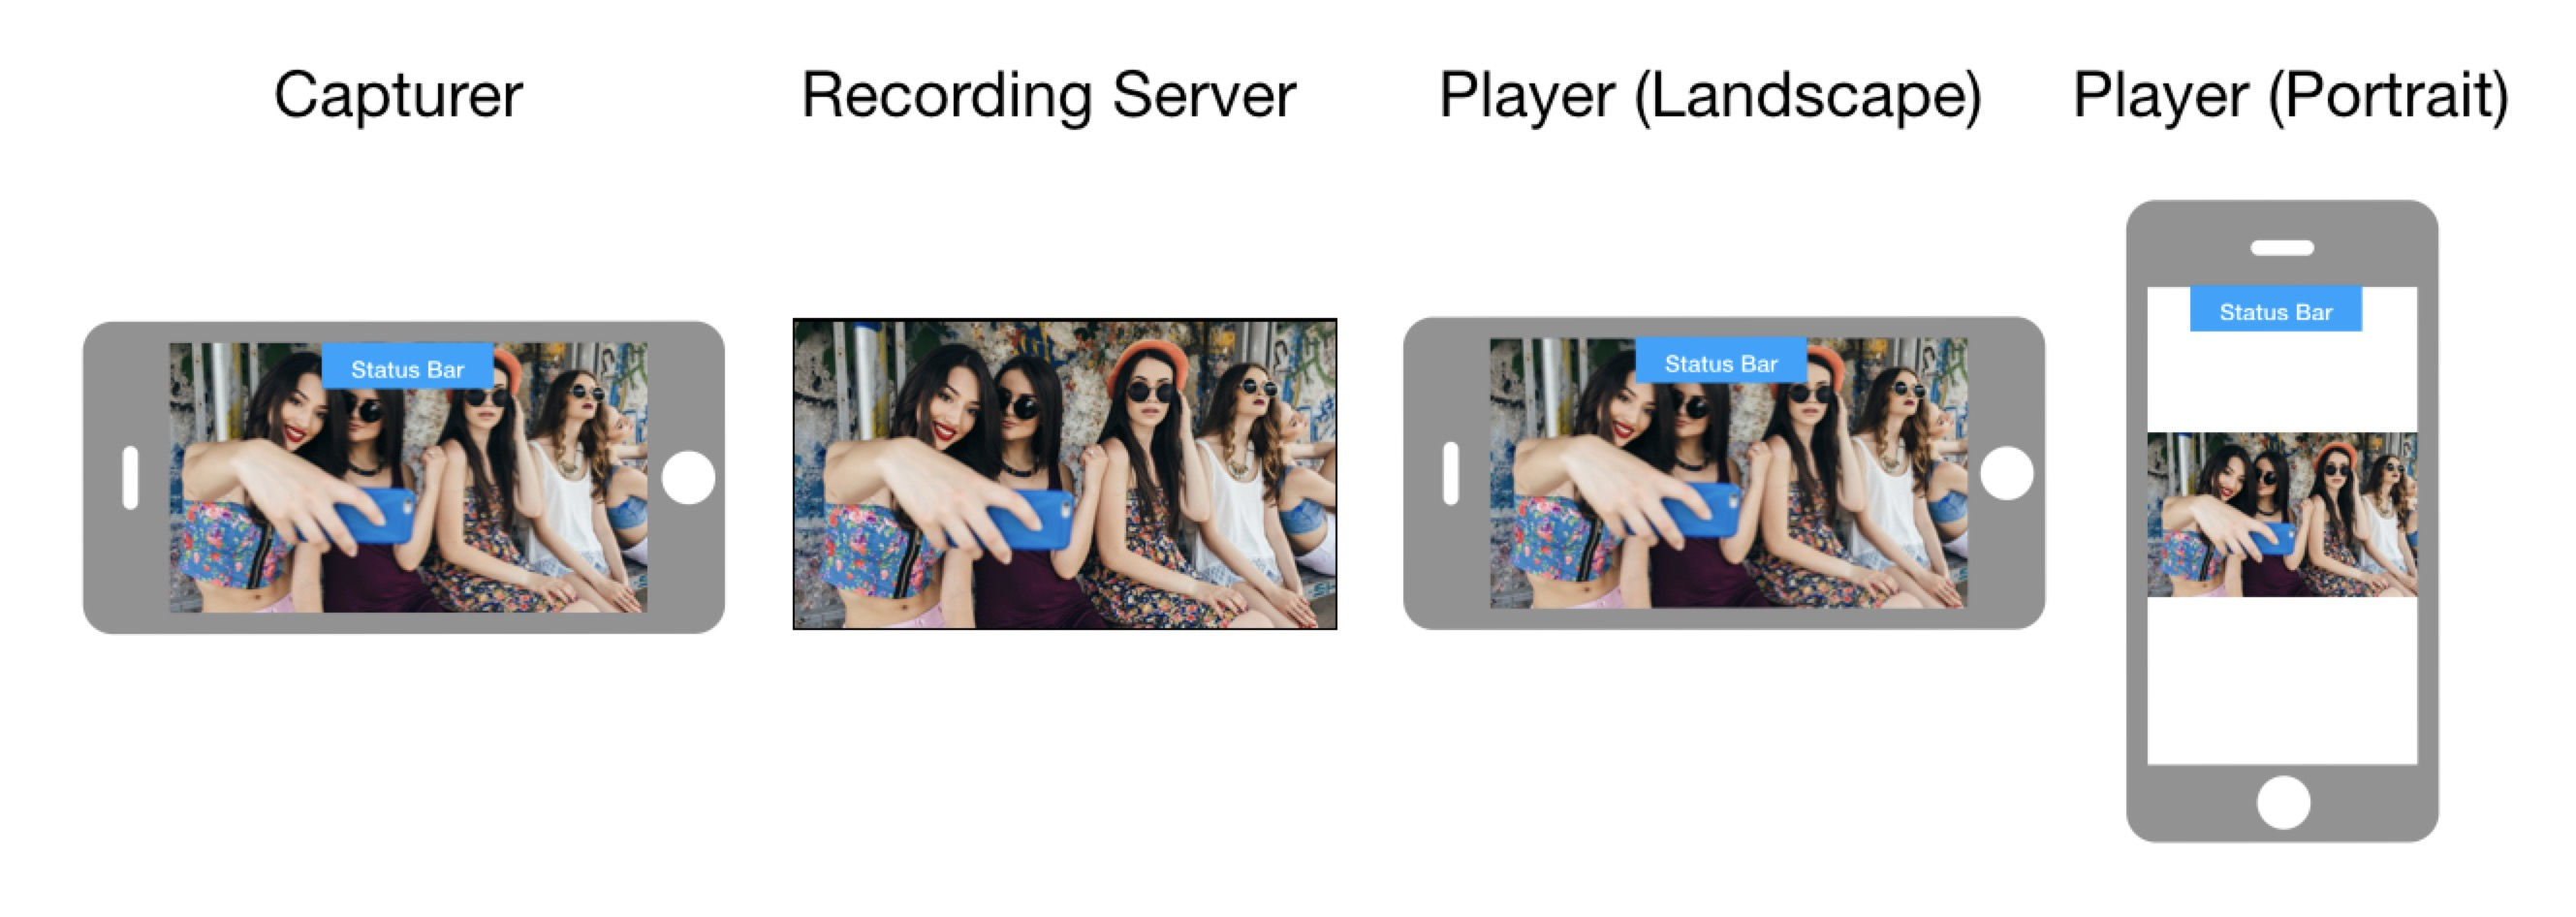
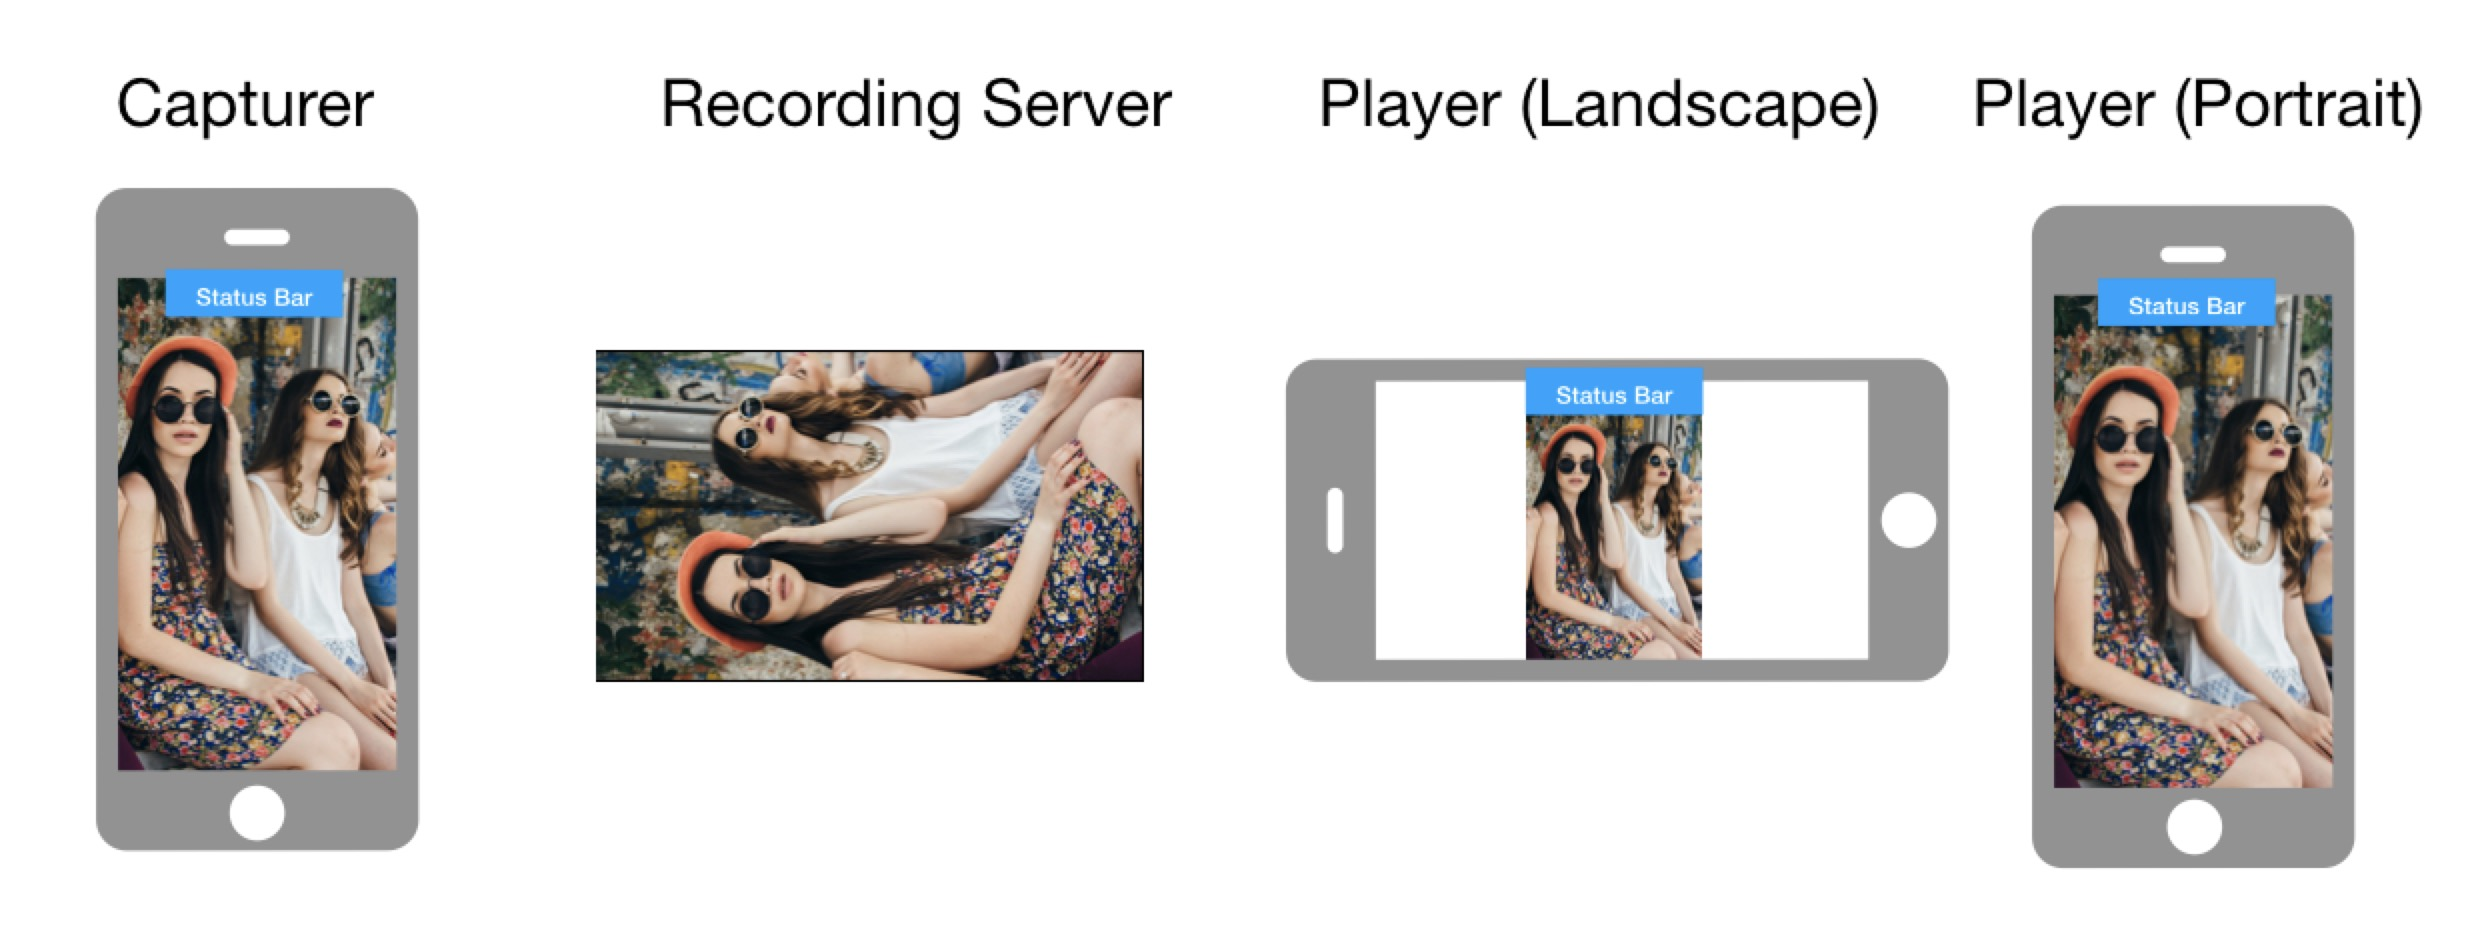
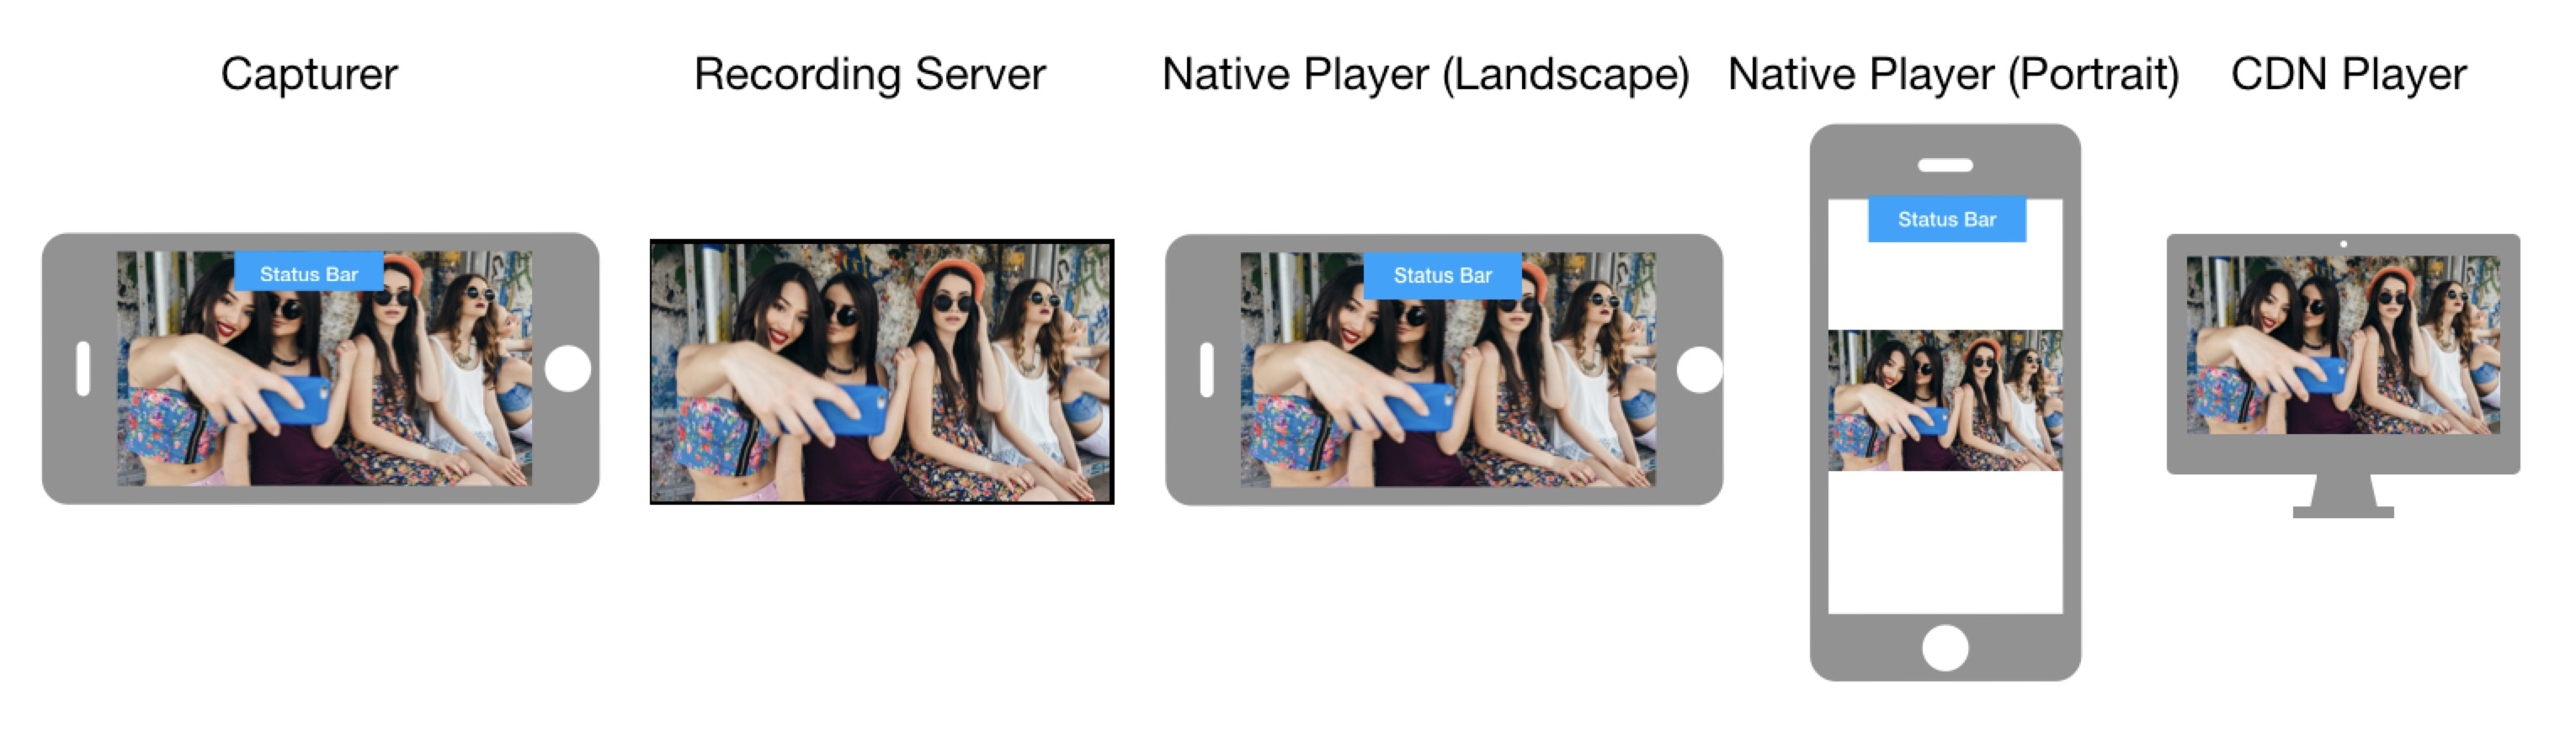
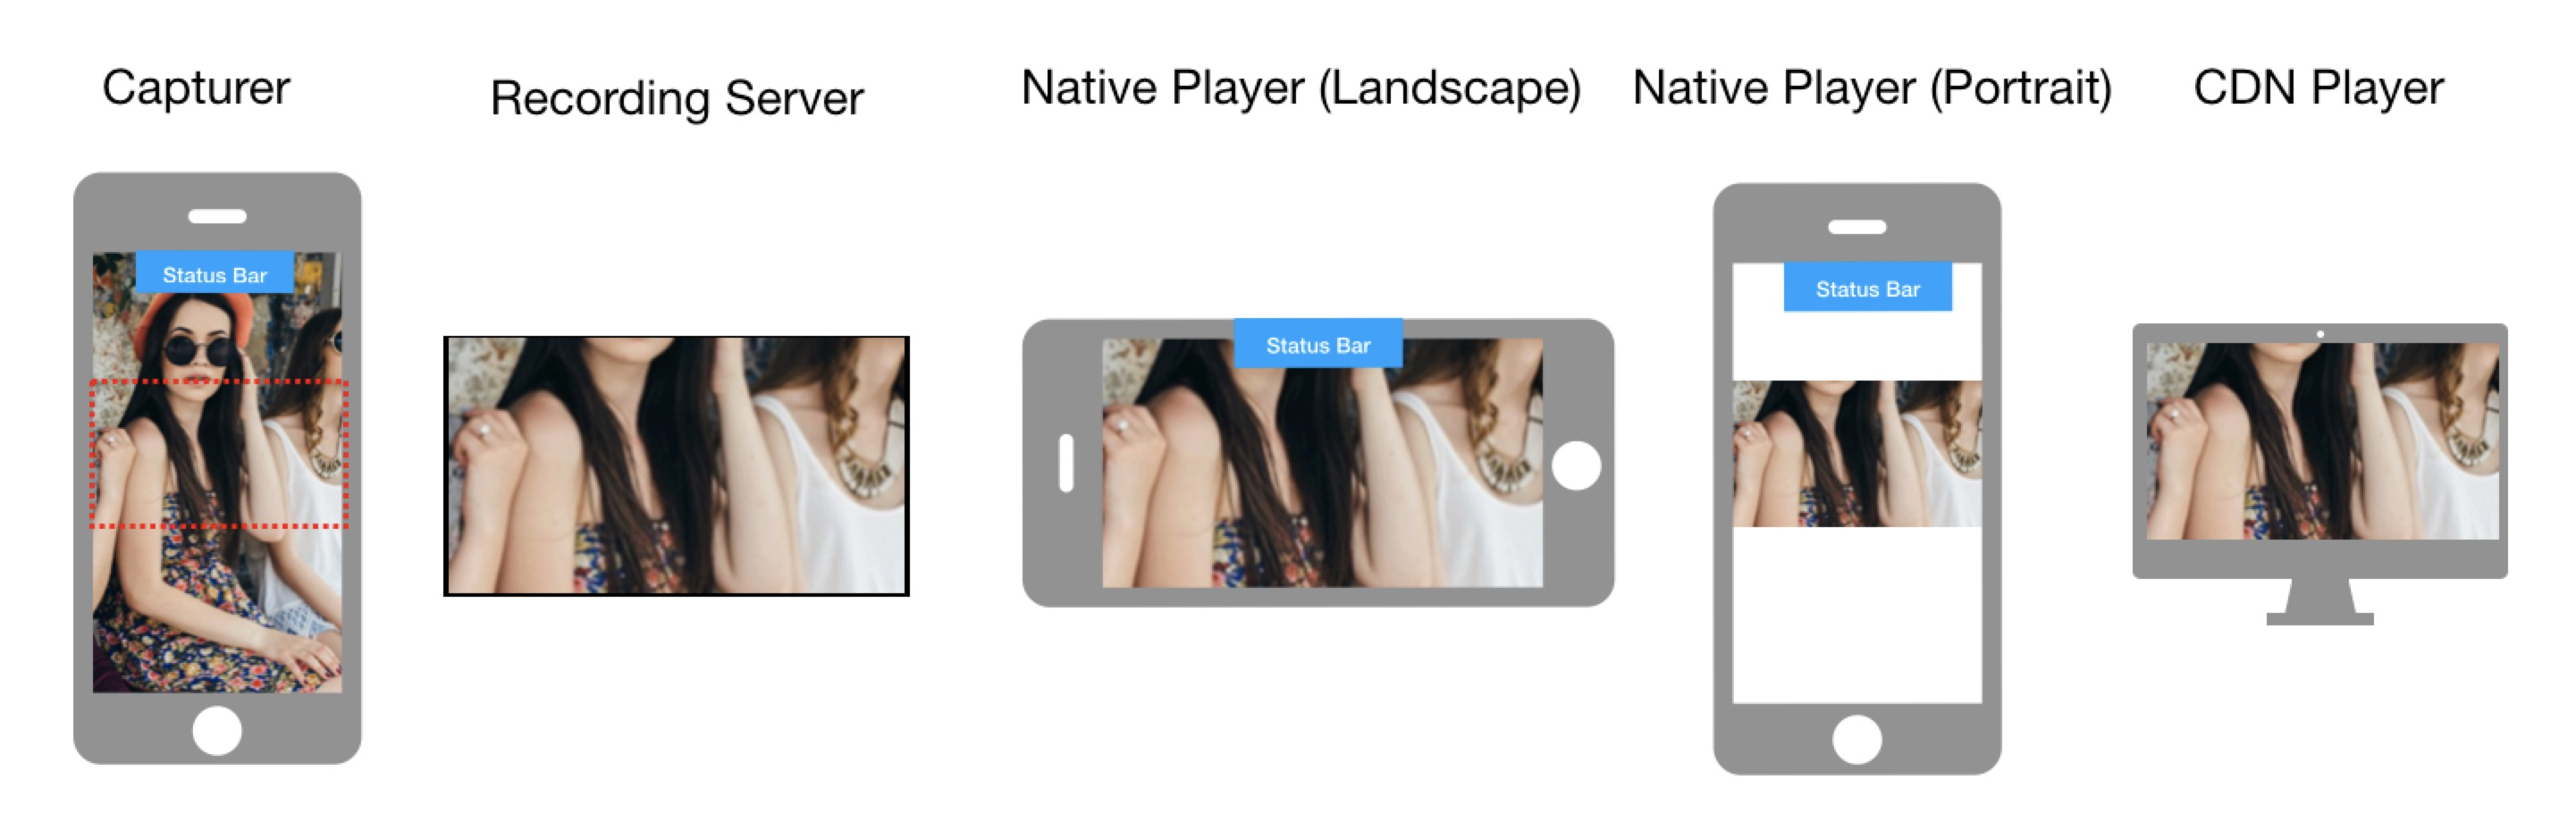
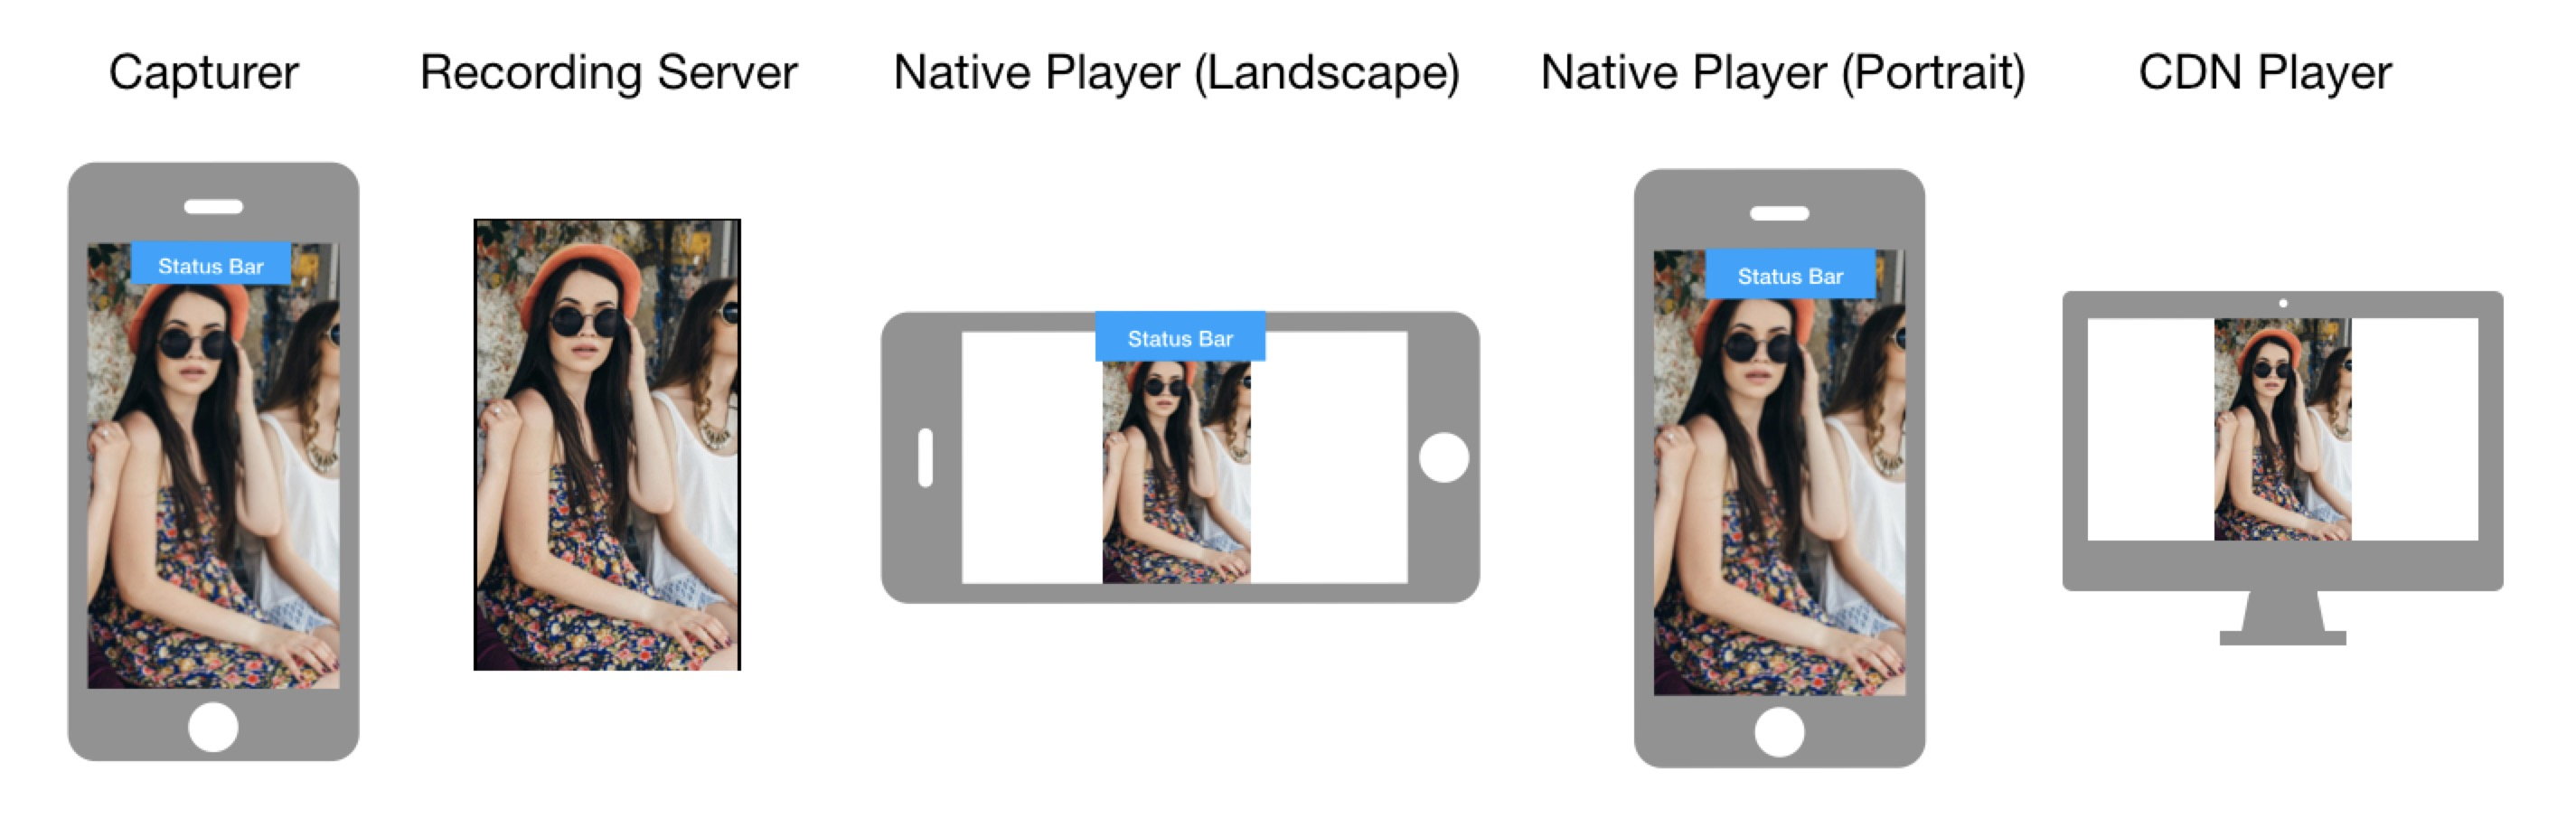
How video is oriented on the playing device
The way video is displayed on the playing device depends on orientationMode used on the encoding device, orientation of the capturing device, orientation of the playing device, and whether screen rotation is enabled on the playing device. The following images show how the video is finally oriented based on these factors.
Orientation mode: Adaptive
-
Screen rotation: Disabled
-
Capturing device orientation: Landscape
-
Screen rotation: Disabled
-
Capturing device orientation: Portrait
-
Screen rotation: Enabled
-
Capturing device orientation: Landscape
-
Screen rotation: Enabled
-
Capturing device orientation: Portrait
Orientation mode: Landscape
-
Capturing device orientation: Landscape
-
Capturing device orientation: Portrait
Orientation mode: Portrait
-
Capturing device orientation: Portrait
-
Capturing device orientation: Landscape