
SDK quickstart

Real-time audio engagement immerses people in the sounds of human connections, keeping them engaged in your app longer. Voice Calling enables you to add one-to-one or small-group voice communication with smooth, jitter-free streaming to your app. Agora's Voice SDK makes it easy to embed real-time audio chat into web, mobile and native apps. Thanks to Agora's intelligent and global Software Defined Real-time Network (Agora SD-RTN™), you can rely on the highest available audio quality.

This page shows the minimum code you need to integrate high-quality, low-latency Voice Calling features into your app using Voice SDK.

Understand the tech

The following figure shows the workflow you need to implement to integrate Voice Calling feature into your app.

Voice Calling

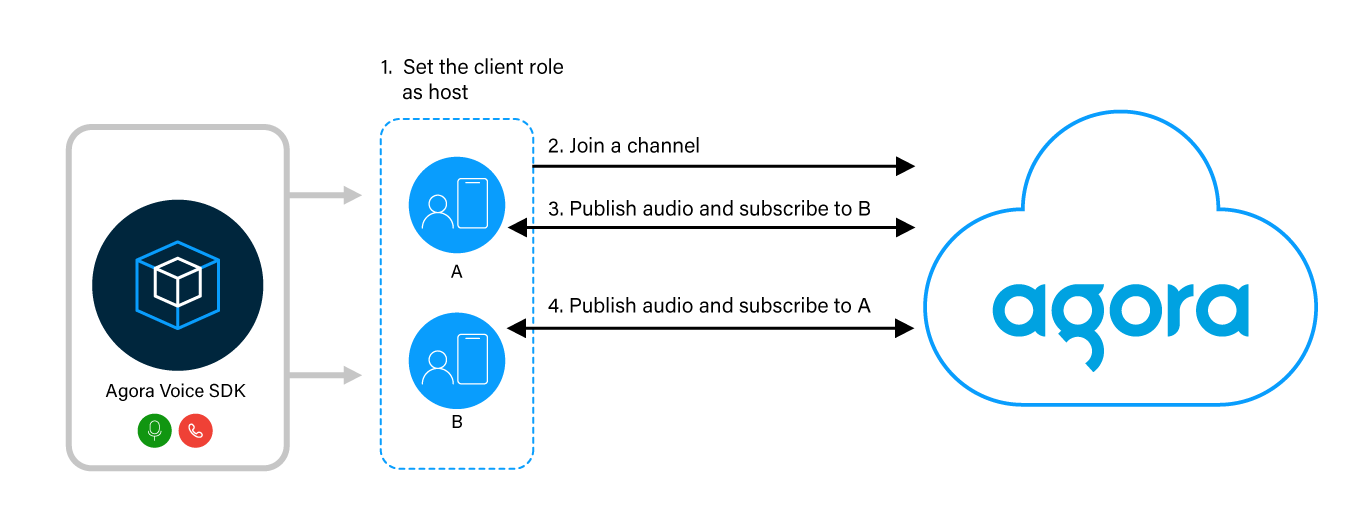
To start a voice call, implement the following steps in your app:

  1. Set the role

    To both publish and subscribe to audio streams, you set the client role as host. Set the role as audience, if you only need to play audio streams published by other users.

  2. Join a channel

    Call the method to join a channel; apps that pass the same channel name join the same channel. After joining a channel, hosts can publish audio streams to the channel and subscribe to each other.

  3. Publish audio in the channel

    Send audio stream to users in the channel.

  4. Subscribe to audio in the channel

    Receive and play audio streams from other users in the channel.

Prerequisites

In order to follow this procedure you must have:

  • Android Studio 4.1 or higher.
  • Android SDK API Level 24 or higher.
  • A mobile device that runs Android 4.1 or higher.
  • An Agora account and project.

  • A computer with Internet access.

    Ensure that no firewall is blocking your network communication.

Project setup

To integrate Voice Calling into your app, do the following:

  1. In Android Studio, create a new Phone and Tablet, Java Android project with an Empty Activity. After creating the project, Android Studio automatically starts gradle sync. Ensure that the sync succeeds before you continue.

  2. Integrate the Voice SDK into your Android project. To do this:

    1. In /Gradle Scripts/build.gradle (Module: <project name>.app), add the following line under dependencies:


      _5
      dependencies {
      _5
      ...
      _5
      implementation 'io.agora.rtc:<artifact id>:<version>'
      _5
      ...
      _5
      }

    2. Replace <artifact id> and <version> with appropriate values for the latest release. For example, io.agora.rtc:voice-sdk:4.0.0.4. You can obtain the latest <artifact id> and <version> information using Maven Central Repository Search.

  3. Add permissions for network and device access. In /app/Manifests/AndroidManifest.xml, add the following permissions after </application>:


    _9
    <uses-permission android:name="android.permission.INTERNET" />
    _9
    <uses-permission android:name="android.permission.RECORD_AUDIO" />
    _9
    <uses-permission android:name="android.permission.MODIFY_AUDIO_SETTINGS" />
    _9
    <uses-permission android:name="android.permission.ACCESS_WIFI_STATE" />
    _9
    <uses-permission android:name="android.permission.ACCESS_NETWORK_STATE" />
    _9
    <uses-permission android:name="android.permission.READ_PHONE_STATE"/>
    _9
    _9
    <!-- The Agora SDK requires Bluetooth permissions in case users are using Bluetooth devices.-->
    _9
    <uses-permission android:name="android.permission.BLUETOOTH" />

  4. To prevent obfuscating the code in Voice SDK, add the following line to /Gradle Scripts/proguard-rules.pro:


    _1
    -keep class io.agora.**{*;}

You are ready to add Voice Calling features to your app.

Implement a client for Voice Calling

When a user opens the app, you initialize Agora Engine. When the user taps a button, the app joins a channel. When another user joins the same channel, their audio is played in the app. This simple workflow enables you to concentrate on implementing Voice SDK features and not the UI bells and whistles.

This section shows how to use the Voice SDK to implement Voice Calling into your app, step-by-step.

Implement the user interface

In the interface, you add a Button to join and leave a channel and a TextView to display connection information. To create this interface, in /app/res/layout/activity_main.xml, replace the contents of the file with the following:


_35
<?xml version="1.0" encoding="UTF-8"?>
_35
<ScrollView xmlns:android="http://schemas.android.com/apk/res/android"
_35
xmlns:tools="http://schemas.android.com/tools"
_35
android:id="@+id/activity_main"
_35
android:layout_width="match_parent"
_35
android:layout_height="match_parent"
_35
tools:context=".MainActivity">
_35
_35
<RelativeLayout
_35
android:layout_width="match_parent"
_35
android:layout_height="wrap_content">
_35
_35
<TextView
_35
android:id="@+id/infoText"
_35
android:layout_width="wrap_content"
_35
android:layout_height="wrap_content"
_35
android:layout_marginStart="16dp"
_35
android:layout_marginEnd="16dp"
_35
android:layout_marginTop="10dp"
_35
android:layout_marginBottom="10dp"
_35
android:layout_alignParentTop="true"
_35
android:text="Press the button to join a channel" />
_35
_35
<Button
_35
android:id="@+id/joinLeaveButton"
_35
android:layout_width="match_parent"
_35
android:layout_height="wrap_content"
_35
android:layout_below="@id/infoText"
_35
android:layout_marginStart="16dp"
_35
android:layout_marginEnd="16dp"
_35
android:onClick="joinLeaveChannel"
_35
android:text="Join" />
_35
_35
</RelativeLayout>
_35
</ScrollView>

You see an error in your IDE. This is because this layout refers to a method that you create later.

Handle the system logic

Import the necessary Android classes and handle the Android permissions.

  1. Import the Android classes

    In /app/java/com.example.<projectname>/MainActivity, add the following lines after package com.example.<project name>:


    _8
    import androidx.core.app.ActivityCompat;
    _8
    import androidx.core.content.ContextCompat;
    _8
    import android.Manifest;
    _8
    import android.content.pm.PackageManager;
    _8
    import android.view.View;
    _8
    import android.widget.Button;
    _8
    import android.widget.TextView;
    _8
    import android.widget.Toast;

  2. Handle the Android permissions

    When your app launches, ensure that the permissions necessary to insert Voice Calling feature into the app are granted. If the permissions are not granted, use the built-in Android feature to request them; if they are granted, return true.

    In /app/java/com.example.<projectname>/MainActivity, add the following lines before onCreate:


    _14
    private static final int PERMISSION_REQ_ID = 22;
    _14
    private static final String[] REQUESTED_PERMISSIONS =
    _14
    {
    _14
    Manifest.permission.RECORD_AUDIO
    _14
    };
    _14
    _14
    private boolean checkSelfPermission()
    _14
    {
    _14
    if (ContextCompat.checkSelfPermission(this, REQUESTED_PERMISSIONS[0]) != PackageManager.PERMISSION_GRANTED)
    _14
    {
    _14
    return false;
    _14
    }
    _14
    return true;
    _14
    }

  3. Show status updates to your users

    In /app/java/com.example.<projectname>/MainActivity, add the following lines before onCreate.


    _4
    void showMessage(String message) {
    _4
    runOnUiThread(() ->
    _4
    Toast.makeText(getApplicationContext(), message, Toast.LENGTH_SHORT).show());
    _4
    }

Implement the Voice Calling logic

The following figure shows the API call sequence of implementing Voice Calling.

image

To implement this logic, take the following steps:

  1. Import the Voice SDK classes

    In /app/java/com.example.<projectname>/MainActivity, add the following lines after the last import statement:


    _5
    import io.agora.rtc2.Constants;
    _5
    import io.agora.rtc2.IRtcEngineEventHandler;
    _5
    import io.agora.rtc2.RtcEngine;
    _5
    import io.agora.rtc2.RtcEngineConfig;
    _5
    import io.agora.rtc2.ChannelMediaOptions;

  2. Declare the variables that you use to create and join a channel

    In /app/java/com.example.<projectname>/MainActivity, add the following lines to MainActivity class:


    _16
    // Fill the App ID of your project generated on Agora Console.
    _16
    private final String appId = "<Your app Id>";
    _16
    // Fill the channel name.
    _16
    private String channelName = "Your channel name";
    _16
    // Fill the temp token generated on Agora Console.
    _16
    private String token = "<your access token>";
    _16
    // An integer that identifies the local user.
    _16
    private int uid = 0;
    _16
    // Track the status of your connection
    _16
    private boolean isJoined = false;
    _16
    _16
    // Agora engine instance
    _16
    private RtcEngine agoraEngine;
    _16
    // UI elements
    _16
    private TextView infoText;
    _16
    private Button joinLeaveButton;

  3. Setup Agora Engine

    To implement Voice Calling, you use Voice SDK to create an Agora Engine instance. In /app/java/com.example.<projectname>/MainActivity, add the following code before onCreate.


    _11
    private void setupVoiceSDKEngine() {
    _11
    try {
    _11
    RtcEngineConfig config = new RtcEngineConfig();
    _11
    config.mContext = getBaseContext();
    _11
    config.mAppId = appId;
    _11
    config.mEventHandler = mRtcEventHandler;
    _11
    agoraEngine = RtcEngine.create(config);
    _11
    } catch (Exception e) {
    _11
    throw new RuntimeException("Check the error.");
    _11
    }
    _11
    }

  4. Handle and respond to Agora Engine events

    To create an instance of IRtcEngineEventHandler, in the MainActivity class, add the following lines after setupVoiceSDKEngine:


    _29
    private final IRtcEngineEventHandler mRtcEventHandler = new IRtcEngineEventHandler() {
    _29
    @Override
    _29
    // Listen for the remote user joining the channel.
    _29
    public void onUserJoined(int uid, int elapsed) {
    _29
    runOnUiThread(()->infoText.setText("Remote user joined: " + uid));
    _29
    }
    _29
    _29
    @Override
    _29
    public void onJoinChannelSuccess(String channel, int uid, int elapsed) {
    _29
    // Successfully joined a channel
    _29
    isJoined = true;
    _29
    showMessage("Joined Channel " + channel);
    _29
    runOnUiThread(()->infoText.setText("Waiting for a remote user to join"));
    _29
    }
    _29
    _29
    @Override
    _29
    public void onUserOffline(int uid, int reason) {
    _29
    // Listen for remote users leaving the channel
    _29
    showMessage("Remote user offline " + uid + " " + reason);
    _29
    if (isJoined) runOnUiThread(()->infoText.setText("Waiting for a remote user to join"));
    _29
    }
    _29
    _29
    @Override
    _29
    public void onLeaveChannel(RtcStats stats) {
    _29
    // Listen for the local user leaving the channel
    _29
    runOnUiThread(()->infoText.setText("Press the button to join a channel"));
    _29
    isJoined = false;
    _29
    }
    _29
    };

  5. Configure the channel before joining

    Before you join a channel, you use ChannelMediaOptions to set the client role, channel profile, and publishing and subscription options. The joinChannel method securely connects the local user to a channel using the selected options and an authentication token. To do this, in the MainActivity class, add the following method:


    _12
    private void joinChannel() {
    _12
    ChannelMediaOptions options = new ChannelMediaOptions();
    _12
    options.autoSubscribeAudio = true;
    _12
    // Set both clients as the BROADCASTER.
    _12
    options.clientRoleType = Constants.CLIENT_ROLE_BROADCASTER;
    _12
    // Set the channel profile as BROADCASTING.
    _12
    options.channelProfile = Constants.CHANNEL_PROFILE_LIVE_BROADCASTING;
    _12
    _12
    // Join the channel with a temp token.
    _12
    // You need to specify the user ID yourself, and ensure that it is unique in the channel.
    _12
    agoraEngine.joinChannel(token, channelName, uid, options);
    _12
    }

  6. Join and leave a channel

    When the user presses the Join button, call joinChannel. When the user presses Leave, call leaveChannel to exit the chat. In /app/java/com.example.<projectname>/MainActivity, add the following code after joinChannel():


    _10
    _10
    public void joinLeaveChannel(View view) {
    _10
    if (isJoined) {
    _10
    agoraEngine.leaveChannel();
    _10
    joinLeaveButton.setText("Join");
    _10
    } else {
    _10
    joinChannel();
    _10
    joinLeaveButton.setText("Leave");
    _10
    }
    _10
    }

Start and stop your app

In this implementation, you initialize and destroy Agora Engine when the app opens and closes. The local user joins and leaves a channel using the same Agora Engine instance. In order to send the microphone audio stream to Agora, you need to ensure that the local user gives permission to access the microphone on the local device.

To elegantly start and stop your app:

  1. Check that the app has the correct permissions and initiate Agora Engine

    In /app/java/com.example.<projectname>/MainActivity, replace onCreate with the following code:


    _16
    @Override
    _16
    protected void onCreate(Bundle savedInstanceState) {
    _16
    super.onCreate(savedInstanceState);
    _16
    setContentView(R.layout.activity_main);
    _16
    _16
    // If all the permissions are granted, initialize the RtcEngine object and join a channel.
    _16
    if (!checkSelfPermission()) {
    _16
    ActivityCompat.requestPermissions(this, REQUESTED_PERMISSIONS, PERMISSION_REQ_ID);
    _16
    }
    _16
    _16
    setupVoiceSDKEngine();
    _16
    _16
    // Set up access to the UI elements
    _16
    joinLeaveButton = findViewById(R.id.joinLeaveButton);
    _16
    infoText = findViewById(R.id.infoText);
    _16
    }

  2. Clean up the resources used by your app

    When a user closes the app, use onDestroy to clean up all the resources you created. In /app/java/com.example.<projectname>/MainActivity, add onDestroy after onCreate:


    _10
    protected void onDestroy() {
    _10
    super.onDestroy();
    _10
    agoraEngine.leaveChannel();
    _10
    _10
    // Destroy the engine in a sub-thread to avoid congestion
    _10
    new Thread(() -> {
    _10
    RtcEngine.destroy();
    _10
    agoraEngine = null;
    _10
    }).start();
    _10
    }

Test your implementation

To ensure that you have implemented Voice Calling in your app:

  1. Generate a temporary token in Agora Console.

  2. In your browser, navigate to the Agora web demo and update App ID, Channel, and Token with the values for your temporary token, then click Join.

  1. In Android Studio, in app/java/com.example.<projectname>/MainActivity, update appId, channelName and token with the values for your temporary token.

  2. Connect a physical Android device to your development device.

  3. In Android Studio, click Run app. A moment later you see the project installed on your device. If this is the first time you run the project, grant microphone access to your app.

  4. Click Join to start a call. Now, you can talk to the remote user using your app.

Reference

This section contains information that completes the information in this page, or points you to documentation that explains other aspects to this product.

  • Downloads shows you how to install Voice SDK manually.

  • To ensure communication security in a test or production environment, use a token server to generate token is recommended to ensure communication security, see Implement the authentication workflow.

Voice Calling