Audio and voice effects
Voice SDK makes it simple for you to publish audio captured through the microphone to subscribers in a channel. In some cases, users want to modify the captured audio to add sound effects, mix in a pre-recorded audio, or change the voice quality before the audio is published. Voice SDK provides several options that enable you to add sound effects, mix in pre-recorded audio, apply voice effects and set the audio route. This page shows you how to implement these features in your channel.
Understand the tech
Using Voice SDK you can implement the following audio features:
-
Audio effects and audio mixing
Some real-time communication applications, such as online gaming and karaoke are built around audio mixing features. Playing a sound effect at the appropriate time or mixing background music with microphone audio is essential to such applications. Voice SDK provides APIs that enable you to implement:
-
Audio Effects: Play audios with a short duration. For example, applause, cheers, and gunshots. You can play multiple audio effects at the same time.
-
Audio Mixing: Play longer music file, such as background music. Using audio mixing, you can play only one file at a time.
-
-
Voice effects
Voice modifying effects such as chat beautifier, singing beautifier, and voice changer are gaining popularity in social interaction and entertainment scenarios. To help you quickly integrate voice effects into your project, Voice SDK provides pre-configured effects. You can choose from the following types of effects:
-
Preset voice beautifiers: Chat beautifier, singing beautifier, and timbre transformation.
-
Preset audio effects: Voice changer, style transformation, room acoustics, and pitch correction.
-
Preset voice conversion: Changes the original voice to make it unrecognizable.
-
Customized audio effects: Controls the voice pitch, equalization, and reverberation.
-
-
Audio route
When audio is played back on a device, it can be routed to one of several hardware components such as earpieces, headphones, speakerphone, or Bluetooth devices. By default Voice SDK routes the Voice Calling audio to the speakerphone. The audio route is changed by the device user when they add or remove an external device. Using Voice SDK, you can change the default audio route or temporarily set an audio route.
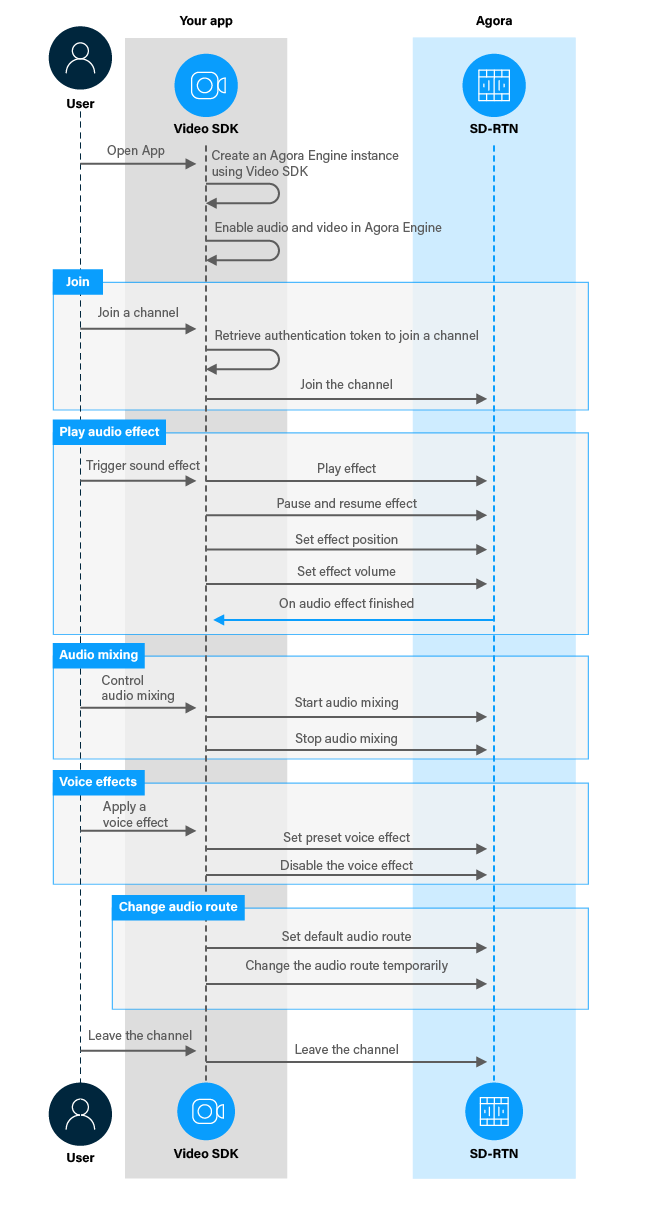
The following figure shows the workflow you need to implement to add audio and voice effects to your app and set the audio route:
Prerequisites
In order to follow this procedure you must have:
- Implemented the SDK quickstart project for Voice Calling.
- Android Studio 4.1 or higher.
- Android SDK API Level 24 or higher.
- A mobile device that runs Android 4.1 or higher.
-
A computer with Internet access.
Ensure that no firewall is blocking your network communication.
Project setup
To create the environment necessary to implement audio and voice effects into your app, open the SDK quickstart Voice Calling project you created previously.
Implement audio and voice effects and set the audio route
When a user plays an audio in the channel, or chooses to apply a voice effect from the available options, your app calls the appropriate Voice SDK method to implement these choices.
This section shows how to play sound effects, apply voice effects, and change the audio route, step-by-step.
Implement the user interface
To enable the user to play sound and voice effects and modify the audio route, add the following elements to the user interface:
- A button to start and stop audio mixing.
- A button to play the sound effect.
- A button to apply various voice effects.
- A switch to turn the speakerphone on or off.
In /app/res/layout/activity_main.xml add the following lines before </RelativeLayout>:
Handle the system logic
This section describes the steps required to use the relevant libraries, declare the necessary variables, and set up access to the UI elements.
-
Import the required Agora and Android libraries
To access and use the
ButtonandSwitchobjects, and integrate Voice SDK audio effects libraries, add the following statements after the lastimportstatement in/app/java/com.example.<projectname>/MainActivity. -
Define variables to manage audio effects and access the UI elements
In
/app/java/com.example.<projectname>/MainActivity, add the following declarations to theMainActivityclass: -
Set up access to the speakerphone switch
In
/app/java/com.example.<projectname>/MainActivity, add the following lines to theonCreatemethod aftersetupVoiceSDKEngine();
Implement sound and voice effects
To add sound and voice effect to your app, take the following steps:
-
Enable the user to start and stop audio mixing
Add the following method to the
MainActivityclass: -
Get the effects manager and pre-load sound effects
To set up playing voice effects, get the
audioEffectManagerand pre-load the sound effects. InsetupVoiceSDKEngineadd the following lines after youcreatethe Agora Engine: -
Play, pause, or resume playing the sound effect
When a user presses the button, the sound effect is played. When they press the button again, the effect is paused and resumed alternately. To do this, add the following method to the
MainActivityclass: -
Update the UI after the effect finishes playing
When Voice SDK has finished playing the sound effect, the
onAudioEffectFinishedevent is fired. To handle this event, in theMainActivityclass, add the following afterprivate final IRtcEngineEventHandler mRtcEventHandler = new IRtcEngineEventHandler() {: -
Set an audio profile
For applications where special audio performance is required, you should set a suitable audio profile and audio scenario. In
setupVoiceSDKEngine, add the following lines after after youcreatethe Agora Engine: -
Apply various voice and audio effects
When a user presses the button, apply a new voice effect and change the text on the button to describe the effect. To do this, add the following method to the
MainActivityclass: -
Set the audio route
When the user toggles the switch, enable or disable the speakerphone. To do this, add the following method to the
MainActivityclass:
Test your implementation
To ensure that you have implemented audio and voice effects into your app:
-
Generate a temporary token in Agora Console.
-
In your browser, navigate to the Agora web demo and update App ID, Channel, and Token with the values for your temporary token, then click Join.
-
In Android Studio, open
app/java/com.example.<projectname>/MainActivity, and updateappId,channelNameandtokenwith the values for your temporary token. -
Connect a physical Android device to your development device.
-
In Android Studio, click Run app. A moment later you see the project installed on your device.
If this is the first time you run the project, grant microphone and camera access to your app.
- To join as a host, select Host and click Join.
-
Press Start Audio Mixing.
You hear the audio file played in the channel mixed with the microphone audio. Press the button again to stop audio mixing.
-
Press Play Audio Effect.
You hear the audio file being played. Press the button again to pause and resume the audio. When the audio has finished playing, you see a toast message.
-
Press Apply voice effect.
Put on headphones connected to your web browser app and speak into the microphone of your Android device. You hear your voice through the headphones with the voice effect name displayed on the button. Press the button again to test all the implemented voice effects one by one.
-
Tap the Speakerphone switch to turn it off. Speak into the microphone connected to your browser app. The audio is routed to the earpiece on your Android device.
Tap the switch again to turn the speakerphone on. When you speak into the browser app microphone, the audio is routed to the speakerphone on your Android device.
Reference
This section contains information that completes the information in this page, or points you to documentation that explains other aspects to this product.
Audio route change workflow
The audio route is changed in the following ways:
- User: Add or remove an external device such as headphones or a Bluetooth audio device.
- Developer:
setDefaultAudioRoutetoSpeakerphone- change the default audio route.setEnableSpeakerphone- temporarily change audio route.
The principles for audio route change are:
-
User behaviour has the highest priority:
- When a user connects an external device the audio route automatically changes to the external device.
- If the user connects multiple external devices in sequence, the audio route automatically changes to the last connected device.
-
Developers can implement the following functionality:
-
Call
setDefaultAudioRoutetoSpeakerphoneto change the default and current setting:The workflow is:
- The app calls
setDefaultAudioRoutetoSpeakerphone(true). The audio route changes to the speakerphone. - The user plugs in headphones. The audio route changes to the headphones.
- The app calls
setDefaultAudioRoutetoSpeakerphone(true). The audio route remains the headphones, becausesetDefaultAudioRoutetoSpeakerphoneworks on the audio route of the device only. - The user unplugs the headphones. The audio route changes to the speakerphone.
- The app calls
-
Call
setEnableSpeakerphoneto temporarily set the audio route to speakerphone or earpiece. BecausesetEnableSpeakerphoneis a transient API, any user behaviour or audio-related API call might change the current audio devicesetEnableSpeakerphone.The workflow is:
- A user joins an interactive live streaming channel. The audio route is the speakerphone.
- The user plugs in headphones. The audio route changes to the headphones.
- The app calls
setEnableSpeakerphone(true). On Android, the audio route changes to the speakerphone. On iOS, the audio route remains the headphones because on iOS, once the mobile deivce is connected to headphones or a Bluetooth audio device, you cannot change to audio route to the speakerphone.
-
Any change to the audio route triggers the
onAudioRouteChanged(Android) ordidAudioRouteChanged(iOS) callback. You can use this callback to get the current audio route.
-