Custom audio sources
By default, Video SDK uses the basic audio and video modules on the device your app runs on. However, there are certain scenarios where you want to integrate a custom audio or video source into your app, such as:
- Your app has its own audio or video module.
- You want to use a non-camera source, such as recorded screen data.
- You need to process the captured audio or video with a pre-processing library for audio or image enhancement.
- You need flexible device resource allocation to avoid conflicts with other services.
Understand the tech
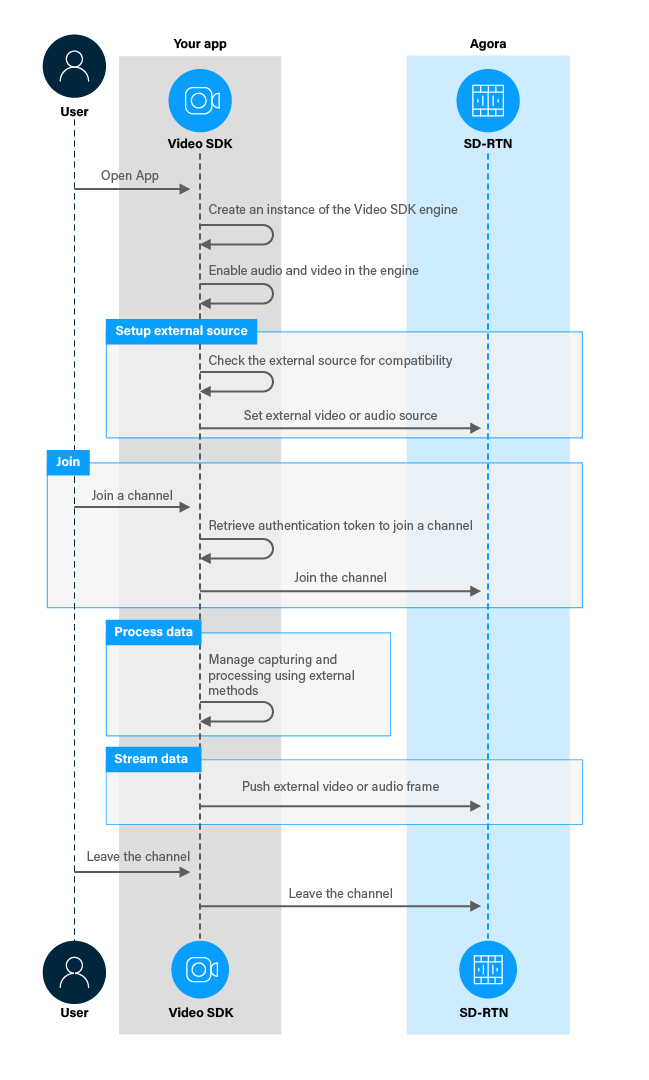
To set an external audio or video source, you configure the Agora Engine before joining a channel. To manage the capture and processing of audio and video frames, you use methods from outside the Video SDK that are specific to your custom source. Video SDK enables you to push processed audio and video data to the subscribers in a channel.
The figure below shows the workflow you need to implement to stream a custom video or audio source in your app.
Prerequisites
To follow this procedure you must have implemented the SDK quickstart project for Voice Calling.
Project setup
To create the environment necessary to implement custom audio and video into your app, open the SDK quickstart Voice Calling project you created previously.
Integrate custom audio or video
To stream from a custom source, you convert the data stream into a suitable format and push this data using Video SDK.
Implement a custom video source
In this section you create the basic framework required to push video frames from a custom source. Depending on the type of your source, you add your own code to this framework that converts the source data to VideoFrame data. To create the basic framework, take the following steps:
-
Import the required Agora and Android libraries
You use the Android
TextureViewandSurfaceTextureobjects for rendering custom video. The video data from theSurfaceTextureis converted to aVideoFramebefore it is pushed to the channel. To use these libraries in your app, add the following statements after the lastimportstatement in/app/java/com.example.<projectname>/MainActivity. -
Define variables to process and push video data
In
/app/java/com.example.<ProductWrapper>/MainActivity, add the following declarations to theMainActivityclass: -
Enable custom video track publishing
When a user presses Join, you configure
ChannelMediaOptionsto enable publishing of the captured video from a custom source. You set the external video source, and set up aTextureViewfor the custom video preview. To do this:-
Add the following lines to the
joinChannel(View view)method in theMainActivityclass afterChannelMediaOptions options = new ChannelMediaOptions();: -
In the
joinChannel(View view)method, remove the following lines:
-
-
Set up a TextureView for the custom video
Create a new
TextureViewobject, and add aSurfaceTextureListenerto it. The listener triggers theonSurfaceTextureAvailablecallback when aSurfaceTexturebecomes available. You add theTextureViewto theFrameLayoutcontainer to display it in the UI. To do this, add the following method to theMainActivityclass: -
Define the
SurfaceTextureListenerWhen a
SurfaceTexturebecomes available, you create apreviewSurfaceTextureand set itsonFrameAvailableListenerlistener. You set up and configure your custom video source, set itsSurfaceTextureto thepreviewSurfaceTexture, and start the preview. To do this, add the following definition of thesurfaceTextureListenerto theMainActivityclass: -
Push the video frames
The
onFrameAvailableListenercallback is triggered when a new video frame is available. In the callback, you convert theSurfaceTexturedata to a Video SDKVideoFrameand push the frame to the channel. To do this, add the followingOnFrameAvailableListenerto theMainActivityclass:
Implement a custom audio source
To push audio from a custom source to a channel, take the following steps:
-
Import the required Android and Java libraries
You use an
InputStreamto read the contents of the custom audio source. The app starts a separateProcessto read and push the audio data. To use these libraries in your app, add the following statements after the lastimportstatement in/app/java/com.example.<projectname>/MainActivity. -
Define variables to manage and push the audio stream
In
/app/java/com.example.<projectname>/MainActivity, add the following declarations to theMainActivityclass: -
Add a raw audio file to the project
In this example, you use an audio file as the source of your custom audio data. To add the audio file to your Android project, create a folder
app\src\main\assetsand add a sample audio file in*.wavor*.rawformat to this folder. Update the value of theAUDIO_FILEvariable to show the audio file name. Also make sure that the values of the audio file parameters in your code match the audio file you placed in the assets folder. -
Enable custom audio track publishing
When a user presses Join, you set the
ChannelMediaOptionsto disable the microphone audio track and enable the custom audio track. You also enable custom audio local playback and set the external audio source. To do this, add the following lines to thejoinChannel(View view)method in theMainActivityclass afteroptions.clientRoleType = Constants.CLIENT_ROLE_BROADCASTER;: -
Open the audio file
When the app starts, you open the audio file. To do this, add the following lines at the bottom of the
onCreatemethod: -
Start the task to push audio frames
When a user successfully joins a channel, you start the task that pushes audio frames. To do this, add the following lines at the bottom of the
onJoinChannelSuccesscallback in theMainActivityclass: -
Read the input stream into a buffer
You read data from the input stream into a buffer. To do this, add the following method to the
MainActivityclass: -
Push the audio frames
You push the data in the buffer as an audio frame using a separate process. To do this, define the following
Runnableclass in theMainActivityclass: -
Close the audio file
When the app is closed, you close the audio file. To do this, add the following lines at the bottom of the
onDestroymethod:
Test your implementation
To ensure that you have implemented streaming from a custom source into your app:
-
Generate a temporary token in Agora Console
-
Add authentication data to the web demo
In your browser, navigate to the Agora web demo and update App ID, Channel, and Token with the values for your temporary token, then click Join.
-
In Android Studio, open
app/java/com.example.<projectname>/MainActivity, and updateappId,channelNameandtokenwith the values for your temporary token. -
Connect a physical Android device to your development device.
-
In Android Studio, click Run app. A moment later you see the project installed on your device.
If this is the first time you run the project, grant microphone and camera access to your app.
-
Test the custom video source
Add code to the basic framework presented above, to do the following:
-
In
onSurfaceTextureAvailableenable the video source and set its parameters. -
In
onSurfaceTextureAvailablesetSurfaceTextureof the custom video source topreviewSurfaceTexture. -
In
onFrameAvailableconvertsurfaceTexturedata to aVideoFrame.
-
-
Test the custom audio source
Press Join. You hear the audio file streamed to the web demo app.
To use this code for streaming data from your particular custom audio source, modify the
readBuffer()method to read the audio data from your source, instead of a raw audio file.
Reference
This section contains information that completes the information in this page, or points you to documentation that explains other aspects to this product.